

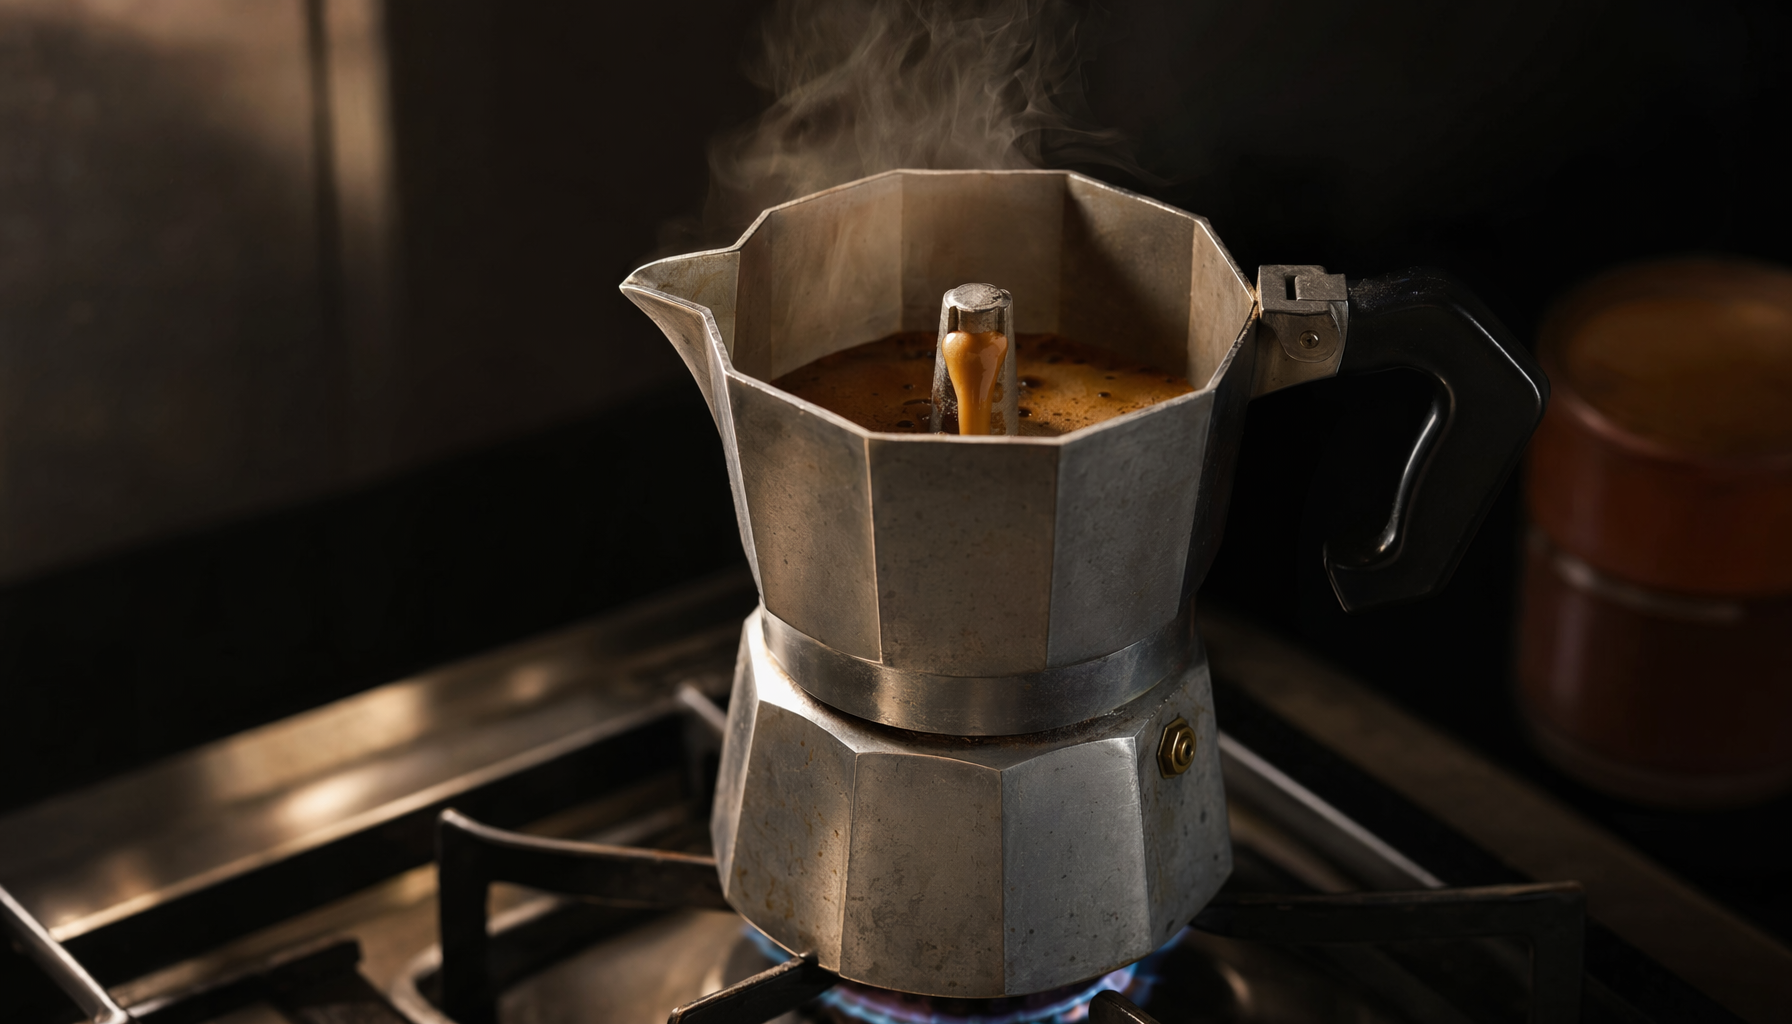
TL;DR — Pre-heat your water before assembly, dial in a grind between espresso and drip, brew on low heat, and pull the moka pot off the burner the second you hear that first sputtering gurgle.

Deeper Dive: Our Top Picks
Our Top Picks
EKDJKK
5-Inch Gas Stove Ring Reducer for Moka Pots and Small Pans
This EKDJKK 5-inch aluminium gas ring reducer creates a stable platform for moka pots, espresso makers and small saucepans, reducing tipping and spills. It suits coffee lovers, campers and cooks who need lightweight small cookware to sit securely on a gas burner.
Pros and Cons
Pros
- Heavy-duty aluminium offers heat resistance and long service life.
- The approximately 5-inch diameter fits most standard household gas stoves.
- Non-slip support improves stability for lightweight cookware and coffee makers.
- Portable design works with home gas stoves, camping stoves and RV setups.
Cons
- It is designed for gas burner frames, so compatibility with electric or unusually shaped grates is not specified.
- The fixed 5-inch size may not suit cookware or burner supports outside its intended small-cookware range.

Sivaphe
Restore 6-Cup Aluminum Moka Pot Brewing with Sivaphe Replacement Infuser Parts
The Sivaphe kit restores a 6-cup aluminum stovetop moka pot with one replacement filter and three silicone gaskets, providing a complete replacement set in one package. Buy it if your compatible aluminum moka pot needs a new filter or fresh seals and you have confirmed the size.
Pros and Cons
Pros
- Includes one aluminum filter and three silicone gasket seals.
- Designed specifically for 6-cup aluminum moka pot coffee makers.
- Provides both filter and sealing components in one replacement kit.
- The silicone gaskets offer multiple replacements for ongoing maintenance.
Cons
- It is not compatible with stainless steel moka pots.
- Buyers must confirm the moka pot size before ordering.
CORNER & COUNTER
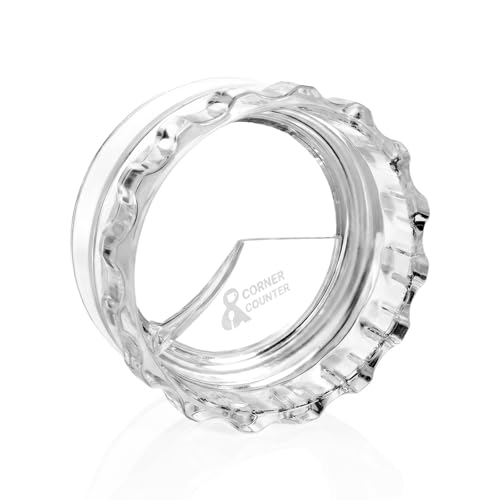
Moka Pot Coffee Ground Funnel for Spill-Free Dosing
This 74mm funnel guides coffee grounds into 1-3 cup moka pots and levels them evenly, reducing spills and waste during preparation. It suits moka pot users who want cleaner dosing, more consistent grounds, and quick cleanup without adding a separate distributor.
Pros and Cons
Pros
- The 2-in-1 design handles both coffee dosing and ground distribution.
- The 74mm size fits 1-3 cup moka pots.
- The spill-proof shape helps keep coffee preparation cleaner.
- Lightweight plastic construction makes the funnel easy to install, rinse, and store.
Cons
- It is limited to 1-3 cup moka pots and may not suit larger models.
- Plastic construction is lightweight and may not provide the solid feel of a metal accessory.

MENSI
Stabilize Moka Pots and Small Cookware on Gas Stoves with MENSI 5.04-Inch Cast Iron Gas Ring Reducer
This cast-iron reducer creates a stable cooking surface for moka pots, espresso makers, small pans, and kettles on gas stoves, with 12 bottom lugs helping prevent movement. It suits gas-stove users who need safer support for small cookware and stovetop coffee makers.
Pros and Cons
Pros
- The 5.04-inch design offers a broader support area for small pots and stovetop coffee makers.
- Cast iron and a stated 66-pound load capacity provide substantial support for cookware.
- The 12-lug base helps prevent the reducer from inadvertently moving on the stovetop.
- It works with espresso makers, moka pots, milk pans, tea kettles, and other small cookware.
Cons
- It is designed for gas hobs, so it does not address cookware stability on electric or induction cooktops.
- The product data does not state the ring's own weight or compatibility with specific burner grate designs.

DITOSH
M65mm Moka Pot Dosing Funnel for 3-Cup Aluminum Stovetop Espresso Makers
This DITOSH dosing funnel guides coffee grounds into a compatible 3-cup moka pot while its rotating design helps distribute grounds evenly with less waste. Buy it if you use a 3-cup octagonal aluminum moka pot and want cleaner, more controlled filling.
Pros and Cons
Pros
- Designed specifically for 3-cup octagonal aluminum moka pots.
- The rotating mechanism supports more even ground distribution.
- Its fitted lower ring helps limit overflow and countertop mess.
- The simple shape offers several practical cleaning options.
Cons
- Compatibility is limited, so buyers should measure the pot opening before ordering.
- The product listing does not specify the funnel's material or weight.
Editors' Picks
EKDJKK 5-Inch Gas Stove Ring Reducer for Moka Pots and Small Pans
EKDJKK
5-Inch Gas Stove Ring Reducer for Moka Pots and Small Pans
This EKDJKK 5-inch aluminium gas ring reducer creates a stable platform for moka pots, espresso makers and small saucepans, reducing tipping and spills. It suits coffee lovers, campers and cooks who need lightweight small cookware to sit securely on a gas burner.
$4.01 at AmazonEditors' Favorite
Color: black Size: free size Dimensions: 5.3149606245 x 5.3149606245 x 0.1968503935 Inches Weight: 0.2425084882 Pounds Product Group: Kitchen
Shop NowSivaphe Restore 6-Cup Aluminum Moka Pot Brewing with Sivaphe Replacement Infuser Parts
Sivaphe
Restore 6-Cup Aluminum Moka Pot Brewing with Sivaphe Replacement Infuser Parts
The Sivaphe kit restores a 6-cup aluminum stovetop moka pot with one replacement filter and three silicone gaskets, providing a complete replacement set in one package. Buy it if your compatible aluminum moka pot needs a new filter or fresh seals and you have confirmed the size.
$6.99 at AmazonGreat Value
Color: Silver Size: 6 cup Dimensions: 2.72 x 3 x 3 inches Product Group: Kitchen
Shop NowCORNER & COUNTER Moka Pot Coffee Ground Funnel for Spill-Free Dosing
CORNER & COUNTER
Moka Pot Coffee Ground Funnel for Spill-Free Dosing
This 74mm funnel guides coffee grounds into 1-3 cup moka pots and levels them evenly, reducing spills and waste during preparation. It suits moka pot users who want cleaner dosing, more consistent grounds, and quick cleanup without adding a separate distributor.
$12.99 at AmazonColor: Transparent Size: Dia 74 x 65 x H35 mm Product Group: Kitchen
Shop NowMENSI Stabilize Moka Pots and Small Cookware on Gas Stoves with MENSI 5.04-Inch Cast Iron Gas Ring Reducer
MENSI
Stabilize Moka Pots and Small Cookware on Gas Stoves with MENSI 5.04-Inch Cast Iron Gas Ring Reducer
This cast-iron reducer creates a stable cooking surface for moka pots, espresso makers, small pans, and kettles on gas stoves, with 12 bottom lugs helping prevent movement. It suits gas-stove users who need safer support for small cookware and stovetop coffee makers.
$12.99 at AmazonDimensions: 5 x 5 x 0.4 Inches Product Group: Major Appliances Binding: Tools & Home Improvement
Shop NowDITOSH M65mm Moka Pot Dosing Funnel for 3-Cup Aluminum Stovetop Espresso Makers
DITOSH
M65mm Moka Pot Dosing Funnel for 3-Cup Aluminum Stovetop Espresso Makers
This DITOSH dosing funnel guides coffee grounds into a compatible 3-cup moka pot while its rotating design helps distribute grounds evenly with less waste. Buy it if you use a 3-cup octagonal aluminum moka pot and want cleaner, more controlled filling.
$7.59 at AmazonColor: Transparent Size: M-65mm Dimensions: 2.76 x 2.76 x 1.38 Inches Weight: 0.13007273458 Pounds Product Group: Kitchen Binding: Unknown Binding
Shop NowAbout These Recommendations
The technique above is the point of this guide; the products are here because they help. We have not tested them ourselves — we did not buy or use this gear. The recommendations come from comparing specifications and materials against the patterns in verified owner reviews, so treat them as a shortlist worth researching rather than a verdict from our own kitchen.
Availability and prices change often, so check the current listing before buying. We earn a commission on purchases made through links on this page, which never affects what we recommend.
The Short Answer
Learning to use a moka pot properly comes down to four things, and the device itself is brilliantly simple — it brews coffee by pushing hot water up through grounds using steam pressure. Pre-heat the water in a kettle before pouring it into the bottom chamber. Use a grind slightly coarser than espresso. Keep the heat on low so extraction stays even. And kill the heat the instant brewing turns from a steady stream to a hissing gurgle. That’s it. Master those steps with a quality best moka pot and you’ll match what an Italian nonna pulls off every morning. It’s not espresso, but it’s the closest stovetop brew gets to that intensity in 2026.
What a Moka Pot Actually Brews
Here’s where most newcomers who want to use a moka pot get confused. The moka pot doesn’t make espresso. Real espresso machines force water through coffee at 9 bars of pressure. A stovetop moka pot generates roughly 1 to 2 bars — about a tenth of that. So what comes out the spout sits somewhere between drip coffee and pulled espresso. Stronger and more concentrated than your morning Mr. Coffee. Thinner and less syrupy than a proper shot.
That doesn’t make it lesser. It makes it different.
Alfonso Bialetti invented the design in 1933 in Crusinallo, Italy, riffing on the era’s new aluminum-casting techniques. The three-chamber stack — water boiler on the bottom, ground coffee in the middle funnel basket, brewed coffee collector on top — became Italy’s domestic coffee ritual within two decades. By the 1950s, nine out of ten Italian homes owned one. The design has barely changed.
Mechanically? Heat turns the water in the lower chamber to steam. Pressure builds. Hot water (not boiling — that’s a common myth) gets pushed up through the coffee bed in the funnel basket, through a riser tube, and out into the upper collector. Because the water passes once and quickly, extraction is sharper than drip but less complete than a French press. You taste body and concentration without the muddiness of immersion methods. Which is exactly why it became the workhorse brew for cappuccinos and lattes at home — that concentrate cuts through milk in a way drip coffee never will.
Treat the moka pot as its own category. It rewards you for it.
The Grind Size Question
Grind is where 80% of mistakes happen when people first use a moka pot. You want a grind that falls right between fine espresso and medium drip. Imagine table salt versus coarse sea salt. You’re aiming for the texture of fine sand — slightly gritty when rubbed between your fingers, but with no chunks.
Why this matters more than people realize: too fine, and the puck compacts under pressure. Water can’t push through evenly, the brew slows to a crawl, and what little liquid does emerge tastes scorched and metallic. You’ll also notice the bottom chamber struggling — sometimes water never makes it up at all, which can trigger the safety valve. Too coarse, and water rushes through too fast. The result is weak, sour, watery coffee that misses the whole point of using a moka pot.
Pre-ground supermarket coffee labeled “espresso” is usually too fine. Pre-ground “drip” is too coarse. Neither works well. A burr grinder set to a fine-medium notch — typically two or three clicks coarser than your espresso setting — produces the right particle size with consistent results brew after brew. Blade grinders create a mix of dust and chunks that extracts unevenly. If you’re serious about home brewing, a dedicated best coffee grinder pays off across every method you’ll ever try, not just this one.
Don’t tamp the grounds. Just level them off with a finger.
The Step-by-Step Brew
Step 1: Pre-Heat Water (Crucial)
Boil water in a kettle first. Then pour it into the bottom chamber up to just below the safety valve — never above it. Why? Cold water sitting on a hot burner extends the time grounds spend at high temperature, which over-extracts bitter compounds and cooks them. Pre-heated water cuts brew time in half and keeps the coffee chamber from baking the grounds before extraction even begins — which is the single biggest reason most beginners who use a moka pot end up with bitter cups. This single change separates good moka pot coffee from harsh, burnt-tasting brews.
Step 2: Fill the Basket Level
Spoon ground coffee into the funnel basket until it’s mounded above the rim. Tap the side gently to settle the grounds, then sweep off the excess with a flat finger or the back of a knife so the bed sits perfectly level. Do not tamp it down. Tamping compresses the puck and chokes water flow — the moka pot needs space between particles to work properly. A loose, level bed gives even saturation.
Step 3: Assemble and Set Low Heat
Screw the top collector onto the base, gripping the bottom chamber with a kitchen towel — that pre-heated water is hot. Hand-tight is enough. Don’t crank it. Place the assembled pot on the smallest burner that fits, dial the heat to medium-low, and leave the lid open so you can watch what happens. High heat is the second-biggest mistake people make. It scorches the metal and the coffee.
Step 4: Watch for the First Gurgle
For 90 seconds to two minutes, nothing visible happens. Then coffee starts streaming into the upper chamber — usually dark and slow at first, lightening as more pressure builds. The stream stays steady for 30 to 45 seconds. When you hear the brew change pitch — a hissing, sputtering gurgle as the last of the water flashes to steam — that’s your signal.
Step 5: Pull Off Heat at the Right Moment
The moment that gurgle starts, lift the pot off the burner. Some pros wrap the base in a cold wet towel to halt extraction immediately, but moving it off the heat is usually enough. Letting the moka pot keep going past the gurgle drives steam through dry grounds, which pulls out scorched, ashtray flavors. Stop early and pour. Stir the coffee in the upper chamber before serving — the first liquid out is stronger than the last, and stirring evens out the cup.
Cleaning Between Brews
If you use a moka pot every morning, cleaning is where owners split into camps. The traditional Italian method says rinse only — hot water, no soap, no scrub pad. Soap residue clings to aluminum and ruins the next brew. The “seasoning” that builds inside the pot after weeks of use supposedly improves the coffee’s body. There’s some truth here: aluminum is porous, and detergents can leave a film. Stainless steel pots don’t have this issue, so soap is fine on those.
Either way, the workflow is the same. After brewing, let the pot cool until you can handle it bare-handed. Unscrew the top, knock the spent puck of grounds into a compost bin or trash, and rinse every part under warm running water. Wipe the gasket and filter plate clean. Reassemble loose, not tight, so the rubber gasket can breathe between uses.
Replace the gasket and filter plate every six months to a year if you brew daily. A worn gasket lets steam escape and pressure drop, which means weaker coffee and uneven extraction. Replacement parts cost a few dollars and slot right in.
Never put a moka pot in the dishwasher. The detergent strips aluminum oxidation in irregular patterns, the heat warps the gasket, and the spray jets shove water into threads where it can’t dry properly. A dishwashed moka pot pits, corrodes, and leaks within months.
Common Mistakes
Cold water start. When you use a moka pot, putting cold water in the base means the moka pot sits on the burner for four to five minutes before brewing even begins. During that time, the heat travels up through the metal and starts cooking the grounds dry. Bitter, scorched flavors come straight from this. Pre-heating water in a kettle and pouring it in already-hot drops total burner time by half and protects the bed of coffee.
Too-fine grind. Espresso-grind coffee compacts into a sealed puck under pressure. Water can’t penetrate evenly, so it finds channels — narrow paths where it rushes through and over-extracts — while leaving the rest of the bed barely touched. The result is bitter, harsh coffee with a metallic edge. If your moka pot brews painfully slowly or the safety valve releases steam, your grind is the first thing to check.
High heat. Cranking the burner to high doesn’t speed up brewing in any useful way. It just superheats the bottom chamber, drives water through the grounds too fast, and burns whatever flavor was there into something acrid. Medium-low heat is the rule. The brewing should take 90 seconds to two minutes once water hits the grounds, not 30 seconds.
Not pre-heating. Even with a fine-tuned grind and the right heat, skipping the kettle step adds three minutes of dry roasting to your coffee bed. Some sources call this the single biggest fix for bad moka pot coffee — and they’re right. The fix takes 60 seconds and transforms the cup.
Letting it sit on the burner after brewing. Once the gurgle starts, the moka pot is done. Leaving it on the heat drives steam through spent grounds, dragging out scorched compounds that taint the entire pot of coffee already sitting in the upper chamber. Lift it off the second you hear that change in sound. If you can’t catch it in time, wrap the base in a damp towel.
Related Questions
Is moka pot coffee the same as espresso?
No. Espresso machines force water through coffee at around 9 bars of pressure. A moka pot generates 1 to 2 bars. The result from a moka pot is stronger and more concentrated than drip coffee, but lacks the crema, body, and intense flavor compression of a real espresso shot. Call it “stovetop espresso” if you want, but technically it’s its own thing — closer to a Turkish-style strong coffee than to a pulled shot.
Why does my moka pot make sour coffee?
Sour coffee usually means under-extraction. Your grind might be too coarse, your heat too high (which rushes water through too fast), or your beans too lightly roasted for the moka pot’s quick contact time. Try a slightly finer grind, lower heat, and a medium-to-dark roast that matches the brew method’s intensity. If you’ve checked all three, your water could also be too soft — moka pots like mineral content for proper extraction.
How do I know when it’s done brewing?
Listen, don’t look. Brewing starts with a steady, quiet stream of coffee into the upper chamber. When you hear the sound change to a hissing, sputtering, or gurgling pitch, the water in the bottom chamber is gone and steam is pushing through dry grounds. That’s your stop signal. Pull the moka pot off the heat immediately. Watching the lid is less reliable because the visual change happens slightly after the audio change.
Can I use moka pots on induction stoves?
Only if the moka pot’s base is induction-compatible. Standard aluminum Bialetti models won’t work on induction cooktops because aluminum is non-ferrous. Look for stainless steel moka pots or induction-specific versions with a magnetic disc bonded to the base. An induction adapter plate is a workaround if you want to use a moka pot on a glass-top induction range, but it adds another layer of heat transfer and tends to overheat the bottom chamber, which causes the exact bitter scorching this guide tells you to avoid.
How often should I replace the gasket?
Every six to twelve months for daily users — sooner if you notice steam escaping from the seam between the top and bottom chambers, weaker coffee, or hardening of the rubber. The filter plate above the gasket should be replaced at the same interval. Both parts cost a few dollars and are sized to specific moka pot models, so order by your pot’s cup size (3-cup, 6-cup, etc.).
Related buying guides: best coffee maker with grinder, best grind and brew coffee maker and best cold brew coffee maker.
Recommended Tools
A great moka pot brew depends as much on the gear around it as the pot itself. The classic aluminum design works well for most kitchens, but stainless steel options handle induction stoves and resist the dishwasher damage that destroys aluminum pots. Pair your moka pot with a dedicated burr grinder for the right particle size, since pre-ground coffee almost always lands at the wrong consistency for this brew method. The five tools below cover the moka pot itself plus the supporting setup most home brewers actually need to nail it from day one.


Write Your Review
No reviews yet. Be the first to share your experience!