

HomeWhisk earns commission from qualifying purchases made through links on this page. We research picks from specifications and owner reviews; we do not test products ourselves.
TL;DR — How to oil a rolling pin is mostly about method: use the right touch, avoid shortcuts that damage the tool, and build the habit into normal kitchen cleanup. Use this as the practical background, then check best baking sheets, best kitchen scale, and best dutch oven for bread baking for specific product options.
We treated this as an editor’s note for home cooks: what matters, what is optional, and which related product guides are worth checking before you buy. For baking tools, sizing, material, accuracy, cleaning, and storage usually decide whether a tool stays useful or gets replaced.


Pros
- Handle-free tapered design gives direct feel for dough thickness and lets you steer the pin with your palms.
- Solid beech construction holds up to repeated use with stiff doughs rather than flexing or denting.
- Included measuring mat means you get a rolling surface and a size guide together instead of buying them separately.
- Smooth sealed finish keeps dough from sticking, which shortens both rolling and cleanup.
Cons
- Wood is hand-wash only and needs occasional mineral oil, so it takes more upkeep than a stainless or marble pin.
- Bakers used to handled pins with rolling barrels face a short adjustment period before the tapered shape feels natural.
A 16-inch tapered French rolling pin paired with a silicone pastry mat, aimed at home bakers who fight uneven crusts and dough that sticks to bare counters.
The taper is the point: pivot on the thick center to thin an edge, or press flat across the middle for even sheets. The mat's printed measurements keep pizza rounds and pastry rectangles to size.
Solid beech wood, burnished and sealed with no visible gaps to trap flour. The mat measures 23.6 by 15.7 inches, wide enough for a full pie crust or large pizza base.
It is hand-wash only. Wipe it down with a damp cloth and re-oil with mineral oil when the wood looks dry, and never leave it soaking.
Best for home bakers who roll dough by hand regularly and want control over thickness rather than the convenience of a handled pin.
Pie and tart crusts benefit most. Start at the center of the dough, roll outward, then use the tapered ends to feather thin edges without tearing the round.
For pizza, roll directly on the mat and use the printed measurements to hit a consistent base size, so bake times stay the same batch to batch.
The pin also handles pasta sheets, cookie dough, fondant, and braided bread, where the weight of solid beech does the pressing on stiffer doughs.

Pros
- Tapered shape gives finer control over pressure than a straight barrel pin with handles.
- Beechwood core is dense enough for daily use in a home or working kitchen.
- Lightweight body reduces arm fatigue during long fondant or cookie sessions.
- Seamless one-piece build has no crevices where dough can collect.
Cons
- Wood cannot be soaked or put in the dishwasher, so it needs hand cleaning and drying after every use.
- The brand notes that manual inspection has limits, so occasional finish flaws slip through to buyers.
A 16-inch handle-free French rolling pin for bakers whose dough keeps coming out thick in the center and thin at the rim.
The tapered contour lets you pivot the pin in an arc, so pie rounds and fondant sheets stay circular and even without repeated re-rolling.
Built from a single piece of natural beechwood, a hard, fine-grained hardwood, then polished smooth so flour and sticky dough release cleanly. Light in the hand and short enough for drawer storage.
It is untreated wood, so it needs a hand wash and immediate towel dry, and it should never sit in water.
Best for home bakers and fondant decorators who want direct control over pressure rather than the leverage of a handled pin.
Pie and tart crust: start from the center and roll outward, rotating the dough a quarter turn each pass so the tapered ends keep the round even.
Fondant and gum paste: dust the polished surface lightly and use the narrow ends to thin edges without tearing the sheet.
Pizza, tortillas and cookie dough: the beechwood weight handles stiff dough, while palm contact tells you exactly where to press harder.
Pros
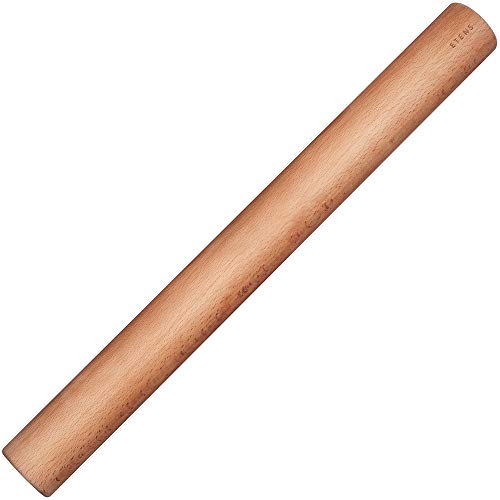
- Long enough to roll and flip oversized dough sheets that overhang a standard pin.
- Solid one-piece wood construction has no bearings, rods, or handles that can loosen over time.
- Thick diameter flattens stiff dough faster than a slim French pin.
- Wipes clean easily and pairs with a pastry mat for a low-mess rolling setup.
Cons
- Wood requires hand washing and prompt drying since the dishwasher and long soaks will raise the grain and dull the finish.
- The straight dowel has no thickness rings or adjustable discs, so consistent results rely on your own feel and pressure.
A 17.3 inch straight wooden dowel pin built for bakers whose dough keeps outgrowing a short pin and tearing at the edges when moved.
The full length lets you roll a wide pizza base or pasta sheet in one motion, then drape it over the pin to flip or transfer it intact.
Hand-finished European solid wood, 1.73 inches thick and one pound in weight, so the pin carries its own pressure into stiff pie and bread dough.
It is bare wood with no thickness guides, so it needs hand washing and gives no built-in measurement help.
Best for home bakers rolling large or frequent batches who prefer direct hands-on control over a mechanical pin.
Pizza and flatbread: start at the center, roll outward, and rotate the dough a quarter turn between passes for an even round.
Pasta and ravioli: the length gives you room to work a sheet thin, then roll it onto the pin to move it to your cutter or mat.
Pastry, cookies, and fondant: flour the pin lightly, chill the dough first, and let the pin's weight flatten it instead of pressing hard.
Oiling a Rolling Pin: The Essentials
Oiling a rolling pin protects the surface and keeps it from drying out or corroding between uses. The trick is a light, even film — too much attracts grime and goes tacky, too little leaves the material exposed.
Step By Step
1. Clean and fully dry the rolling pin first; oil traps anything left behind. 2. Apply a few drops of a food-safe oil to a lint-free cloth. 3. Rub it in along the grain or surface until evenly coated. 4. Wipe off any excess so the finish is protected, not greasy.
Common Mistakes To Avoid
The usual failure is treating a durable baking tool as indestructible. Harsh shortcuts lead to rust on bare steel, and finishes that scratch off. Do not assume pricier gear removes the need for care, either — technique matters more than the badge. Start your shortlist with best baking sheets, best kitchen scale, and best dutch oven for bread baking before narrowing by budget.
Keeping It That Way
Maintenance beats repair. Fold lining with parchment, storing flat to prevent bending, and drying fully before storage into your routine and the baking tool will stay reliable for years. Neglect any one of them and you invite uneven browning back.
Before You Start
Match the method to the baking tool in front of you. Oil a rolling pin is not hard, but the details matter — the wrong approach to avoiding thermal shock can shorten the life of otherwise good baking gear. For product picks, compare best baking sheets, best kitchen scale, and best dutch oven for bread baking.
Related Product Guides
If this topic is part of a buying decision, these are the HomeWhisk guides most closely tied to it:
- best baking sheets
- best kitchen scale
- best dutch oven for bread baking
- best mixing bowls
- best cutting board
- best food storage containers
Frequently Asked Questions
What is the right way to oil a rolling pin?
Oiling a rolling pin protects the surface and keeps it from drying out or corroding between uses. Do it consistently and you avoid finishes that scratch off.
Is a premium baking tool worth it?
Only if you use it enough to notice better control, durability, or cleanup regularly. Occasional users are well served by a mid-range pick like those in best dutch oven for bread baking.
Who is this most useful for?
Mainly high-volume holiday bakers, and anyone scaling recipes by weight. If that is you, treat release performance as a requirement rather than a nice-to-have.
What gear pairs well with it?
Start with a reliable core piece, then add as needs appear. Compare best baking sheets, best kitchen scale, and best dutch oven for bread baking for related choices.
What is the bottom line?
Match the baking tool to your real habits: buy for durability if it is daily, for value and storage if it is occasional.
The Bottom Line
A good rolling pin decision should feel obvious after you line up size, material, cleaning, and durability. If it is still a purchase question, the next step is best baking sheets, best kitchen scale, and best dutch oven for bread baking.
{“@context”:”https://schema.org”,”@type”:”FAQPage”,”mainEntity”:[{“@type”:”Question”,”name”:”What is the right way to oil a rolling pin?”,”acceptedAnswer”:{“@type”:”Answer”,”text”:”Oiling a rolling pin protects the surface and keeps it from drying out or corroding between uses. Do it consistently and you avoid finishes that scratch off.”}},{“@type”:”Question”,”name”:”Is a premium baking tool worth it?”,”acceptedAnswer”:{“@type”:”Answer”,”text”:”Only if you use it enough to notice better control, durability, or cleanup regularly. Occasional users are well served by a mid-range pick like those in best dutch oven for bread baking.”}},{“@type”:”Question”,”name”:”Who is this most useful for?”,”acceptedAnswer”:{“@type”:”Answer”,”text”:”Mainly high-volume holiday bakers, and anyone scaling recipes by weight. If that is you, treat release performance as a requirement rather than a nice-to-have.”}},{“@type”:”Question”,”name”:”What gear pairs well with it?”,”acceptedAnswer”:{“@type”:”Answer”,”text”:”Start with a reliable core piece, then add as needs appear. Compare best baking sheets, best kitchen scale, and best dutch oven for bread baking for related choices.”}},{“@type”:”Question”,”name”:”What is the bottom line?”,”acceptedAnswer”:{“@type”:”Answer”,”text”:”Match the baking tool to your real habits: buy for durability if it is daily, for value and storage if it is occasional.”}}]} {“@context”:”https://schema.org”,”@type”:”ItemList”,”numberOfItems”:5,”itemListElement”:[{“@type”:”ListItem”,”position”:1,”url”:”https://www.amazon.com/dp/B0CR14C2ZX?tag=homewhisk06-20″},{“@type”:”ListItem”,”position”:2,”url”:”https://www.amazon.com/dp/B0FJLVDBM3?tag=homewhisk06-20″},{“@type”:”ListItem”,”position”:3,”url”:”https://www.amazon.com/dp/B0BX6N4SKB?tag=homewhisk06-20″},{“@type”:”ListItem”,”position”:4,”url”:”https://www.amazon.com/dp/B0FHQ4C24L?tag=homewhisk06-20″},{“@type”:”ListItem”,”position”:5,”url”:”https://www.amazon.com/dp/B08FSNLW8G?tag=homewhisk06-20″}]}





Write Your Review
No reviews yet. Be the first to share your experience!