

HomeWhisk earns commission from qualifying purchases made through links on this page. We research picks from specifications and owner reviews; we do not test products ourselves.
TL;DR — How to oil a loaf pan is mostly about method: use the right touch, avoid shortcuts that damage the tool, and build the habit into normal kitchen cleanup. If you are comparing products, start with best baking sheets, best kitchen scale, and best dutch oven for bread baking; those guides give the model-level context behind this advice.
We looked at manufacturer details, material behavior, recurring owner-review patterns, and where this topic overlaps with related buying guides. For baking tools, sizing, material, accuracy, cleaning, and storage usually decide whether a tool stays useful or gets replaced.

Pros
- No chemical coating means nothing can flake into food at high oven temperatures.
- Dishwasher safe with a brushed interior that reduces food sticking.
- Two-inch depth holds enough batter for mini loaves to rise with a proper domed top.
- Handles oven, air fryer, stock pot, and freezer duty from a single set.
Cons
- Bare stainless is not nonstick, so greasing or a parchment lining is still required for sticky quick breads.
- The listing text contradicts itself on piece count, so confirm the set size before ordering.
A set of uncoated stainless steel mini loaf pans for baking single-serving breads, meatloaf, and brownies without committing to a full-size loaf that goes stale before anyone finishes it.
Heavy-gauge walls heat quickly and evenly, so a banana loaf browns across the whole crust. Rated to 450F and sized to fit most air fryer baskets.
One-piece construction leaves no welded seams to leak or trap batter. Two-inch depth allows a real rise, rounded corners release loaves whole, and wide rolled edges give a secure grip with mitts.
Bare steel has no release layer, so grease or line the pans for sticky doughs or expect some sticking at the base.
Best for solo bakers and small households who want durable, coating-free pans for portioned loaves and freezer-ready leftovers.
Grease and flour the pan or use a parchment sling before pouring batter. Bare stainless browns crusts faster than glass, so start checking mini loaves several minutes before the stated bake time.
Fill each pan about two-thirds full to leave headroom within the two-inch depth. Bake all three on the same rack so airflow stays even between them.
In an air fryer, drop the temperature roughly 25F and tent the top with foil if the surface darkens before the center sets.
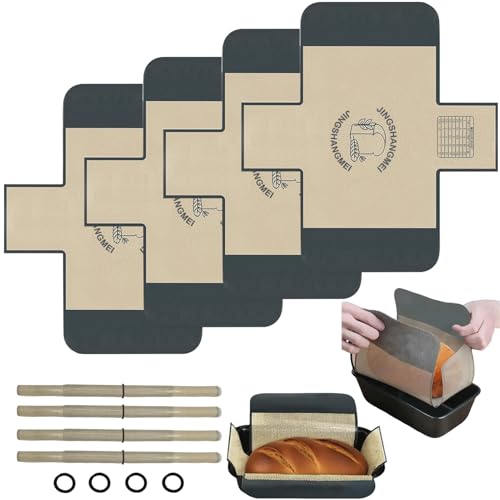
Pros
- Handles solve the actual pain point of prying a hot loaf out of a narrow pan.
- Wide temperature range covers oven, freezer, and reheating in one liner.
- Smooth silicone wipes clean in seconds instead of soaking a scorched pan.
- Sized to the most common 9x5 inch, 1.5 lb loaf pan standard.
Cons
- Fit is specific to standard 9x5 inch pans, so smaller 8x4 tins or Pullman pans will leave the liner bunched.
- Silicone insulates the sides, which can leave a paler, softer crust than baking directly against metal.
A set of four silicone inserts that line a standard loaf pan and lift the finished bake out, replacing parchment slings and greased pans.
The two built-in handles are the core feature: grip both sides and a sourdough loaf or meatloaf comes out level, without a knife around the edges.
Food-grade silicone rated 500°F down to -40°F, flexible enough to fold flat for storage and sized to 9x5 inch, 1.5 lb pans.
Silicone shields the loaf sides from direct pan heat, so crust browning is gentler than bare metal and may need a few extra minutes.
Best for regular bread bakers who want repeatable clean release and are tired of buying disposable liners.
Press the liner flat into the pan corners before adding dough so the loaf keeps square sides instead of rounded, uneven edges.
For a darker crust on sourdough or pound cake, lift the loaf out by the handles for the last few minutes and finish it directly on the rack.
Let the pan cool briefly before lifting so the crumb sets, then pull both handles evenly and slide the loaf onto a rack.
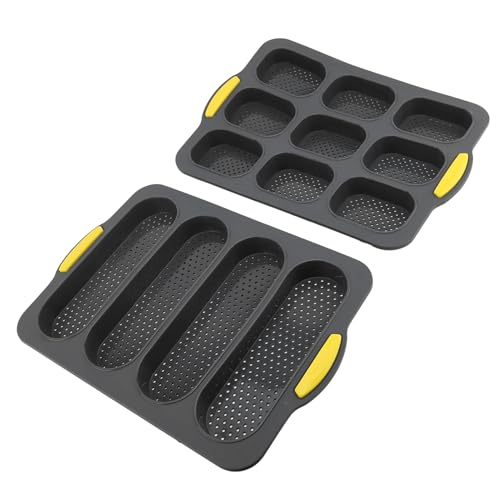
Pros
- Nine-cavity and four-cavity pans let you bake portioned loaves and full-size mini breads in the same session.
- Included oil brush and silicone scraper handle greasing and batter portioning without extra tools.
- Non-stick silicone surface means no cracked or torn loaves during release.
- Microwave and dishwasher compatibility keeps the whole set in rotation for reheating leftovers.
Cons
- Silicone cannot go under a broiler or over direct flame, so it is limited to standard oven and microwave baking.
- Flexible pans need a baking sheet underneath for support when moving a full load in and out of the oven.
A two-piece silicone bakeware set that solves the stuck-loaf problem of metal mini tins, where greasing and prying out small breads wastes time.
The perforated base is the standout: airflow reaches the bottom of each cavity, so crusts firm up instead of staying pale and damp.
Built from flexible food-grade silicone with reinforced rims and molded support feet, it stores flat or rolled and weighs far less than a cast metal pan.
The flexibility that makes release easy also means the pans need a sheet tray underneath when loaded with batter.
Best for home bakers batching mini loaves, cornbread, or buns who want portion control and hands-off cleanup.
Set the filled pan on a rigid baking sheet before it goes in the oven. This keeps cavities level and gives you a safe way to lift the whole batch.
Fill each cavity about two-thirds full so mini loaves dome rather than spill over the reinforced edge.
Let loaves cool a few minutes before releasing, then push up from the base of each cavity instead of pulling from the top.
Oiling a Loaf Pan: The Essentials
Oiling a loaf pan protects the surface and keeps it from drying out or corroding between uses. The trick is a light, even film — too much attracts grime and goes tacky, too little leaves the material exposed.
Step By Step
1. Clean and fully dry the loaf pan first; oil traps anything left behind. 2. Apply a few drops of a food-safe oil to a lint-free cloth. 3. Rub it in along the grain or surface until evenly coated. 4. Wipe off any excess so the finish is protected, not greasy.
Keeping It That Way
Maintenance beats repair. Fold hand-washing to protect the finish, drying fully before storage, and storing flat to prevent bending into your routine and the baking tool will stay reliable for years. Neglect any one of them and you invite uneven browning back.
What You Will Need
Keep it simple: the baking tool itself, a clean workspace, and any basic supplies the material calls for. Set up before you start so you are not improvising mid-task.
Before You Start
Match the method to the baking tool in front of you. Oil a loaf pan is not hard, but the details matter — the wrong approach to hand-washing to protect the finish can shorten the life of otherwise good baking gear. For product picks, compare best baking sheets, best kitchen scale, and best dutch oven for bread baking.
Common Mistakes To Avoid
The usual failure is treating a durable baking tool as indestructible. Harsh shortcuts lead to batter that sticks, and rust on bare steel. Do not assume pricier gear removes the need for care, either — technique matters more than the badge. Start your shortlist with best baking sheets, best kitchen scale, and best dutch oven for bread baking before narrowing by budget.
Related Product Guides
If this topic is part of a buying decision, these are the HomeWhisk guides most closely tied to it:
- best baking sheets
- best kitchen scale
- best dutch oven for bread baking
- best carbon steel pan for cooking
- best mixing bowls
- best cutting board
- best food storage containers
Frequently Asked Questions
What is the right way to oil a loaf pan?
Oiling a loaf pan protects the surface and keeps it from drying out or corroding between uses. Do it consistently and you avoid finishes that scratch off.
What is the bottom line?
Match the baking tool to your real habits: buy for durability if it is daily, for value and storage if it is occasional.
Is a premium baking tool worth it?
Only if you use it enough to notice better control, durability, or cleanup regularly. Occasional users are well served by a mid-range pick like those in best dutch oven for bread baking.
How do I keep it in good shape?
Build skipping abrasive scrubbers, and drying fully before storage into normal cleanup. Light, consistent care prevents batter that sticks far better than occasional deep effort.
Who is this most useful for?
Mainly beginners baking their first loaves, and weekend bakers. If that is you, treat nonstick or bare finish as a requirement rather than a nice-to-have.
The Bottom Line
How to oil a loaf pan comes down to fit: how often you use the tool, how much care it needs, and whether it solves a real kitchen problem. If you are buying, compare best baking sheets, best kitchen scale, and best dutch oven for bread baking before you spend.
{“@context”:”https://schema.org”,”@type”:”FAQPage”,”mainEntity”:[{“@type”:”Question”,”name”:”What is the right way to oil a loaf pan?”,”acceptedAnswer”:{“@type”:”Answer”,”text”:”Oiling a loaf pan protects the surface and keeps it from drying out or corroding between uses. Do it consistently and you avoid finishes that scratch off.”}},{“@type”:”Question”,”name”:”What is the bottom line?”,”acceptedAnswer”:{“@type”:”Answer”,”text”:”Match the baking tool to your real habits: buy for durability if it is daily, for value and storage if it is occasional.”}},{“@type”:”Question”,”name”:”Is a premium baking tool worth it?”,”acceptedAnswer”:{“@type”:”Answer”,”text”:”Only if you use it enough to notice better control, durability, or cleanup regularly. Occasional users are well served by a mid-range pick like those in best dutch oven for bread baking.”}},{“@type”:”Question”,”name”:”How do I keep it in good shape?”,”acceptedAnswer”:{“@type”:”Answer”,”text”:”Build skipping abrasive scrubbers, and drying fully before storage into normal cleanup. Light, consistent care prevents batter that sticks far better than occasional deep effort.”}},{“@type”:”Question”,”name”:”Who is this most useful for?”,”acceptedAnswer”:{“@type”:”Answer”,”text”:”Mainly beginners baking their first loaves, and weekend bakers. If that is you, treat nonstick or bare finish as a requirement rather than a nice-to-have.”}}]} {“@context”:”https://schema.org”,”@type”:”ItemList”,”numberOfItems”:5,”itemListElement”:[{“@type”:”ListItem”,”position”:1,”url”:”https://www.amazon.com/dp/B0F9X46QWK?tag=homewhisk06-20″},{“@type”:”ListItem”,”position”:2,”url”:”https://www.amazon.com/dp/B0FF2SW86Z?tag=homewhisk06-20″},{“@type”:”ListItem”,”position”:3,”url”:”https://www.amazon.com/dp/B0H3YH9PQ1?tag=homewhisk06-20″},{“@type”:”ListItem”,”position”:4,”url”:”https://www.amazon.com/dp/B0FBGLRG3K?tag=homewhisk06-20″},{“@type”:”ListItem”,”position”:5,”url”:”https://www.amazon.com/dp/B0CJ6MH7TF?tag=homewhisk06-20″}]}



Write Your Review
No reviews yet. Be the first to share your experience!