

TL;DR — Most “dead” air fryers aren’t broken. The top fixes, in order, are: confirm power at the outlet (test another device), fully seat the basket and drawer so the safety interlock switch engages, let an overheated unit cool for 30–60 minutes, and deep-clean grease off the heating element and fan. If it won’t heat, the interlock switch, thermal fuse, or heating element is the usual culprit; if it won’t turn on at all, suspect the cord, plug, or internal fuse. Error codes E1–E4 point to specific faults. Unplug before inspecting anything. When repair isn’t worth it, see our best air fryer guide.
The HomeWhisk editorial team researches kitchen equipment by analyzing manufacturer service documentation, component design, and aggregated owner reports from major retailers and repair communities. This guide follows the same logical sequence a technician uses, starting with the cheapest and safest checks before anything involving tools.

An air fryer is mechanically simple: a heating element (usually a coiled nichrome wire), a fan that circulates hot air around the food, a thermostat and temperature sensor, a timer or control board, and a safety interlock that cuts power when the basket is removed. That makes it easier to diagnose than a multi-function appliance like a best stand mixer or best blender, where a failure could be electronic or mechanical. When one stops working, the fault almost always lives in one of those parts, and you can isolate it methodically. Work through the steps in order and do not skip ahead, because the early steps are the most common fixes and the safest to perform. If yours is out of warranty and the fix looks costly, our best air fryer guide covers reliable replacements.
Fix Soggy Food and Uneven Cooking with Air Fryer Mistakes & Fixes
This reference guide explains how to address soggy food, uneven cooking, and other common air fryer problems, with fast troubleshooting as its biggest advantage. It suits air fryer users who want targeted fixes instead of guessing why meals are turning out poorly.
Pros and Cons
Pros
- Covers three clear problem areas: soggy food, uneven cooking, and common air fryer issues.
- Its troubleshooting focus can help users solve cooking problems faster.
- The reference format gives air fryer owners a single place to consult for fixes.
Cons
- The product data does not provide detailed features, specifications, or sample guidance.
- It addresses problems broadly, so buyers seeking advice for a specific air fryer model may need more targeted information.

GSZN
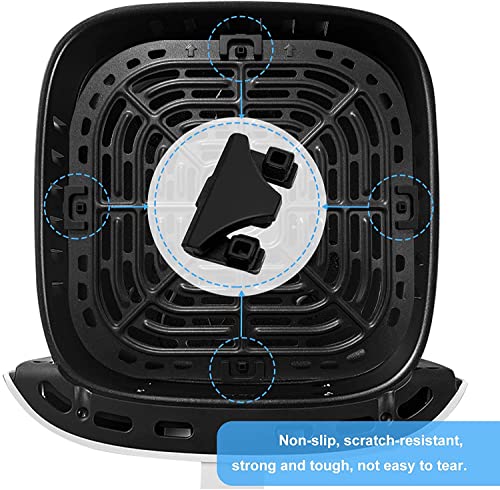
Air Fryer Tray Rubber Feet Replacement for Instants Vortex & COSORI, GSZN 8-Piece Silicone Tabs
These GSZN silicone rubber feet replace worn tray tabs, helping protect air fryer interiors from scratches with heat resistance up to 430°F. Buy them if your Instants Vortex, COSORI, Dreo, or similarly sized tray needs non-slip replacement feet.
Pros and Cons
Pros
- Premium silicone is described as strong, tough, scratch-resistant, and difficult to tear.
- The 8-piece set provides replacement tabs for multiple tray positions or future replacements.
- The pieces meet FDA standards and are BPA-free, non-toxic, and tasteless.
- The compact 1.2 x 0.67 x 0.31-inch design suits compatible air fryer grill plates.
Cons
- Fit is not universal, so buyers must compare the listed dimensions with their tray before ordering.
- The product data does not provide the individual tab weight.

Independently Published
Air Fryer Cookbook for Beginners and Small Households: The Complete Guide to Cook Awesome Recipes and How to Use the Air Fryer
This paperback pairs a plain-language walkthrough of air fryer operation with a recipe collection portioned for one or two servings, so a new machine goes from box to dinner without guesswork. Buy it if you just unboxed an air fryer and want usage instruction and small-batch meals in one printed place instead of scattered across bookmarked tabs.
Pros and Cons
Pros
- Combines appliance instruction and recipes in one book, so beginners skip the hunt for a lost manual.
- Portion sizing for one or two people fits singles, couples, and empty nesters better than family-scale cookbooks.
- Low-commitment way to learn a new appliance before spending on racks, liners, or other accessories.
- Print format holds up next to a hot appliance and needs no app or account.
Cons
- The listing does not state recipe count, page count, or whether dishes are photographed, so visual cooks are buying without confirmation.
- Independently published, so recipes have not passed through a test kitchen and cook times may need adjusting to your specific wattage and basket size.
Fix Soggy Food and Uneven Cooking with Air Fryer Mistakes & Fixes
Fix Soggy Food and Uneven Cooking with Air Fryer Mistakes & Fixes
This reference guide explains how to address soggy food, uneven cooking, and other common air fryer problems, with fast troubleshooting as its biggest advantage. It suits air fryer users who want targeted fixes instead of guessing why meals are turning out poorly.
$1.99 at AmazonEditors' Favorite
Formats: Kindle eBook Product Group: Digital Ebook Purchas Binding: Kindle Edition
Shop NowGSZN Air Fryer Tray Rubber Feet Replacement for Instants Vortex & COSORI, GSZN 8-Piece Silicone Tabs
GSZN
Air Fryer Tray Rubber Feet Replacement for Instants Vortex & COSORI, GSZN 8-Piece Silicone Tabs
These GSZN silicone rubber feet replace worn tray tabs, helping protect air fryer interiors from scratches with heat resistance up to 430°F. Buy them if your Instants Vortex, COSORI, Dreo, or similarly sized tray needs non-slip replacement feet.
$6.99 at AmazonGreat Value
Color: Black Size: 6QT for Instant Dimensions: 0.393700787 x 0.1968503935 x 0.00787401574 Inches Weight: 0.01 pounds Product Group: Kitchen Binding: Kitchen
Shop NowIndependently Published Air Fryer Cookbook for Beginners and Small Households: The Complete Guide to Cook Awesome Recipes and How to Use the Air Fryer
Independently Published
Air Fryer Cookbook for Beginners and Small Households: The Complete Guide to Cook Awesome Recipes and How to Use the Air Fryer
This paperback pairs a plain-language walkthrough of air fryer operation with a recipe collection portioned for one or two servings, so a new machine goes from box to dinner without guesswork. Buy it if you just unboxed an air fryer and want usage instruction and small-batch meals in one printed place instead of scattered across bookmarked tabs.
$13.99 at AmazonDimensions: 6 x 0.67 x 9 Inches Weight: 0.8708259349 Pounds Product Group: Book Binding: Paperback
Shop NowSafety First: Before You Touch Anything
Unplug the air fryer and let it cool completely. The heating element and interior reach 350–400°F in use and hold heat for a while afterward. Never insert metal tools, water, or fingers near the element while the unit is plugged in. Air fryers are not user-serviceable the way a toaster is, and opening the base exposes mains-voltage connections. The steps below cover everything a home user can safely check; anything requiring you to splice wires or replace a heating element on a mains circuit is a job for a qualified repair service, especially if the unit is still under warranty, since opening it usually voids that warranty.
Step 1: Check the Power Supply
Start at the wall. Plug a phone charger or lamp into the same outlet to confirm it has power, then check your breaker panel for a tripped breaker or a blown GFCI (press the reset button on GFCI outlets, which are common in kitchens). Air fryers draw a lot of current, typically 1,400–1,700 watts, which is 12–15 amps on a 120V circuit. On a shared kitchen circuit, running an air fryer alongside a microwave or kettle can overload it and trip the breaker. Try the air fryer on a different circuit, plugged directly into the wall rather than a power strip or extension cord, which can’t reliably carry that load.
Step 2: Inspect the Cord and Plug
With the unit unplugged, run your hand along the entire cord feeling for kinks, stiffness, melted spots, or exposed wire, and inspect the plug for scorching, bent prongs, or a loose fit. A damaged cord is a genuine fire hazard and a common failure point because the cord flexes and heats near a hot appliance. Wiggle the cord at both the plug and where it enters the base while the unit is set to run; if it flickers on and off, there is a broken conductor inside. A frayed or heat-damaged cord means retire or professionally repair the unit, not tape it.
Step 3: Fully Seat the Basket and Drawer
This is the single most common “my air fryer won’t heat” fix. Almost every air fryer has a safety interlock switch that only lets the element and fan run when the basket and drawer are pushed all the way in. If food debris, a warped basket, or slight misalignment keeps the drawer from seating fully, the switch never closes and the unit acts dead or refuses to heat while the display stays lit. Remove the basket, clear any crumbs or grease from the track and the back of the drawer cavity, and firmly push it home until it clicks. On many models you can hear or feel the interlock engage.
Step 4: Reset the Unit
Unplug the air fryer for 30–60 minutes. This does two things: it lets the control board fully power-cycle, clearing transient electronic glitches, and it lets the internal thermal cutoff reset. Many units have a self-resetting thermal fuse (a bimetallic switch) that trips when the interior overheats and only closes again once it cools. If your air fryer ran fine, then suddenly cut out mid-cook and won’t restart, an overheat trip is very likely, and a cool-down often revives it. Plug it back in and test on a short, low-temperature cycle.
Step 5: Look for Overheating Causes
If the unit keeps overheating and shutting off, find out why. The most common reasons are blocked airflow and grease buildup. Air fryers need clearance around the rear and top vents, typically 4–5 inches, to exhaust hot air; pushed against a wall or under a cabinet, they overheat. Accumulated grease on the element also smokes and traps heat. Check that the intake and exhaust vents (usually on the back) are clear of grease and debris, and give the unit breathing room. Overheating that persists after cleaning and repositioning points to a failing fan or a bad temperature sensor.
Step 6: Inspect the Heating Element
With the unit unplugged and cool, look at the coiled heating element at the top of the cooking chamber. A healthy element glows evenly red when running. Signs of trouble are a visible break in the coil, dark or blistered spots, or heavy carbonized grease coating it. Baked-on grease insulates the element and prevents proper heating; carefully clean it with a damp cloth and a soft brush once cool, never while powered. If the coil is physically broken or a section stays dark while the rest glows, the element has failed. Element replacement involves opening the base and is best left to a repair service unless you are experienced with appliance electrics.
Step 7: Check the Fan
The convection fan is what makes an air fryer “fry”; without it you have a slow, uneven oven. Plug in and run the unit (basket seated) and listen. A working fan produces a steady whir. Warning signs are silence, grinding, rattling, or a burning smell. The most common fan problem is grease and debris jamming the blades or shaft, so a thorough cleaning of the fan area, accessible from the top chamber on many models, often frees it. A fan that stays seized, noisy, or dead after cleaning usually means a failed fan motor, which again is an internal repair.
Step 8: Deep-Clean the Whole Unit
Grease is the number-one long-term killer of air fryers because it coats the element, jams the fan, blocks vents, and drips onto the control board. Wash the basket and drawer in warm soapy water (or the dishwasher if labeled safe), and use a non-abrasive brush to clean grease off the element and fan area once fully cool. Wipe the interior and the vents. Never immerse the base, which houses the electronics, and never use metal scourers that scratch the nonstick coating. A genuinely clean unit frequently comes back to life, and cleaning after every use is the best prevention there is.
Step 9: Understand the Error Codes
Digital models flash codes that narrow the fault quickly. Exact meanings vary by brand, but the common convention is: E1 usually means a temperature sensor (thermistor) fault, an open or shorted sensor the board can’t read. E2 typically signals that overheat protection has activated; let it cool and improve ventilation. E3 often means the basket or drawer isn’t detected, so reseat it (back to Step 3). E4 commonly indicates a fan or airflow fault. Flashing lights with no code usually point to a control-board or power issue. Check your model’s manual for the exact table, since Cosori, Ninja, Philips, and Instant assign codes differently.
Frequently Asked Questions
Why is my air fryer not heating but the light is on?
This almost always means power is reaching the control board but the heating circuit isn’t completing. The top suspect is the basket not being fully seated, which leaves the safety interlock switch open so the element never energizes; reseat the drawer firmly until it clicks. Next likely causes are a tripped thermal fuse from a previous overheat (unplug and cool for an hour), a failed interlock switch, or a burned-out heating element. Since the display works, the board and power supply are probably fine, so focus on the interlock and element.
Why won’t my air fryer turn on at all?
A completely dead unit with no lights or sound points to a power-delivery problem rather than the heating side. Confirm the outlet works with another device, check for a tripped breaker or GFCI, and inspect the cord and plug for damage. Plug directly into the wall, not a power strip, since air fryers draw 12–15 amps that strips handle poorly. If power is confirmed good and the cord is intact, the fault is usually an internal fuse or the control board, which is an internal repair. Compare replacement value in our best air fryer guide.
Can an air fryer be repaired instead of replaced?
Sometimes, but weigh the economics. Genuinely user-fixable issues, reseating the basket, cleaning grease off the element and fan, cooling an overheated unit, or replacing a damaged cord on repair-friendly models, are worth doing. Internal faults like a failed heating element, fan motor, or control board require opening the mains-powered base, and replacement parts plus labor often approach the cost of a new unit, which is why many are replaced rather than repaired. If yours is out of warranty with an internal fault, replacing is usually the sensible call. See our best air fryer and best deep fryer guides.
How much does air fryer repair cost?
Simple part swaps like a cord or an accessible interlock switch may run modest parts costs if you supply the labor. Professional repair of a heating element, fan motor, or control board typically runs a service fee plus parts that can total a meaningful fraction of, or exceed, a mid-range air fryer’s price, since these appliances are built as sealed units rather than modular ones. Because entry and mid-range models are relatively inexpensive, technicians and owners often conclude that internal repairs aren’t cost-effective. Reserve paid repair for premium or large-capacity units.
Why does my air fryer keep tripping the breaker?
Air fryers pull 1,400–1,700 watts, so on a shared kitchen circuit they can exceed the breaker’s rating when other appliances run at the same time; move the air fryer to its own circuit and never use a lightweight extension cord. If it trips a dedicated circuit or a GFCI instantly on its own, that indicates an internal short, a ground fault in the element or wiring, which is a safety issue. Stop using it, unplug it, and have it inspected or replace it. A repeated ground-fault trip is not something to work around.
Is it safe to keep using an air fryer that smells like burning?
Only after you find the cause. A brand-new unit often has a harmless break-in smell for the first few uses as manufacturing residues burn off. Ongoing burning smells usually mean accumulated grease on the element (clean it once cool) or, more seriously, melting insulation or an electrical fault. An acrid, plastic, or electrical burning smell, or any visible smoke from the base rather than the food, means unplug immediately and stop using it until inspected. Grease smoke is fixable by cleaning; electrical burning is not something to ignore.
The Bottom Line
Most air fryer failures trace to a handful of simple causes, and working through them in order, power supply, cord, basket seating, reset and cool-down, then cleaning the element and fan, revives a large share of “dead” units without any tools. The safety interlock and overheat protection are designed to make the unit act broken when it isn’t, so reseating the basket and letting it cool are the highest-yield fixes. Error codes E1–E4 narrow the rest to a sensor, overheat, seating, or fan issue. Draw the line at opening the mains-powered base: element, fan-motor, and control-board repairs belong to a professional and, on inexpensive units, often cost more than a replacement. When repair isn’t worth it, see our best air fryer, best toaster oven, and best instant pot guides for what to buy next.




Write Your Review
No reviews yet. Be the first to share your experience!