

HomeWhisk earns commission from qualifying purchases made through links on this page. We research picks from specifications and owner reviews; we do not test products ourselves.
TL;DR — Unplug and cool the toaster oven, remove and wash the crumb tray and racks in warm soapy water, wipe the interior with a baking-soda paste or mild cleaner (avoid the heating elements), and clean the glass door. Empty the crumb tray weekly to prevent smoking and fire risk. The HomeWhisk team compiled this from care guidance and aggregated feedback. The crumb tray is the part people forget, and built-up crumbs are the main cause of smoke and burning smells. For choosing one, see our best toaster oven guide.
The HomeWhisk editorial team researches kitchen equipment by analyzing manufacturer specifications, cleaning guidance, and aggregated user reviews from major retailers and cooking communities. This guide reflects established toaster-oven care principles, not personal testing.

A toaster oven collects crumbs, grease splatter, and baked-on residue that cause smoke, odors, and even fire risk if neglected. Cleaning is straightforward once you know which parts come out and how to handle the interior. Here’s how. For choosing a model, see our best toaster oven guide.
Pros & Cons
Pros
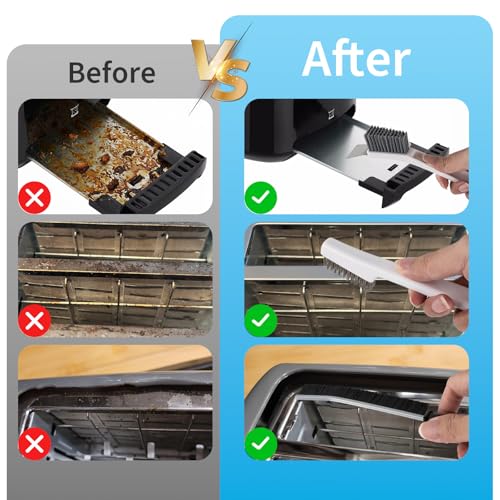
- Soft yet firm bristles are designed to remove crumbs and burnt residue from narrow toaster slots.
- The set works across toasters, toaster ovens, and several other kitchen surfaces.
- The brush is washable, compact, and designed for comfortable handling.
Cons
- The product data does not specify the exact number of tools, dimensions, or weight.
- Buyers who only need occasional toaster cleaning may not use the full multi-purpose set.
Details
The MEIJIAYOU Toaster Cleaning Brush Set removes crumbs, burnt residue, and dust from toaster slots and toaster oven interiors, addressing buildup that is difficult to reach with a cloth.
Dense bristles are soft yet firm enough to reach narrow spaces while being designed for use around heating elements and toaster interiors.
The ergonomic handle supports a comfortable grip, while wear-resistant bristles and washable construction suit repeated kitchen cleanup.
Exact dimensions, weight, and the number of included tools are not provided in the product data.
Best for households needing one compact cleaning kit for multiple toaster and kitchen cleanup tasks.
Best Uses
Use the brush to clear crumbs and residue from 2-slice toasters, 4-slice toasters, and toaster ovens.
Use the additional tools on ovens, stoves, microwaves, air fryers, pots, pans, and sink corners.
Rinse with warm water and mild soap after use, then air dry before storing in a drawer, cabinet, or on a hook.

Pros & Cons
Pros
- Two mats per pack means you can cut one to fit your oven and save the second for an air fryer or toaster oven.
- The 0.28mm thickness resists curling and warping under a hot oven better than thinner liners.
- Cleans with a damp cloth or in the dishwasher, no degreaser or scouring pad needed.
- Waterproof surface keeps sugary pie filling and cheese from bonding to the material.
Cons
- It is a consumable, not a permanent fix, and the non-stick coating wears out after repeated use and cleaning.
- It cannot go directly on the oven floor, so gas ovens and electric ovens with exposed elements need careful placement on the lowest rack or underneath the element.
Details
A two-pack of cut-to-fit oven floor liners that intercept bubbling casseroles, pie filling, and grease before they burn onto the oven bottom.
The 500F heat rating covers standard baking and roasting, and the waterproof surface means dried-on cheese lifts with a damp cloth rather than a scraper.
Built from 0.28mm PTFE-coated fiberglass at 16×24 inches, thick enough to lie flat without curling, light enough to trim with kitchen scissors.
The coating degrades with use and scrubbing, so treat these as replaceable rather than permanent.
Best for home bakers who run messy dishes often and want oven cleanup off the weekend chore list.
Cooking Tips
Measure your oven interior, then trim the mat about an inch smaller on each side so it does not block airflow or touch the walls.
Place it on the lowest rack, never on the oven floor. In electric ovens with exposed elements, slide it beneath the element.
Wipe with a damp cloth while the mat is still warm but not hot. Skip the scrubbing motion, which strips the non-stick layer and shortens its life.
Safety First and the Crumb Tray
Before cleaning, a couple of safety basics — and the crumb tray, which is the most important and most neglected part.
Always unplug the toaster oven and let it cool completely before cleaning. The heating elements and interior stay hot after use, and cleaning a plugged-in appliance risks shock. Give it time to cool fully.
The crumb tray is priority one. Most toaster ovens have a removable crumb tray in the bottom that slides out. Crumbs, grease, and food debris collect there, and when they build up they burn, smoke, smell, and can even catch fire — the crumb tray is the leading cause of toaster-oven smoke and the biggest safety concern.
To clean it: slide out the crumb tray, dump the crumbs, and wash it in warm soapy water (or wipe if lightly soiled), dry, and replace. Do this weekly, or more often with heavy use — it’s the single most important toaster-oven cleaning habit. If your model lacks a removable tray, tip the oven to shake crumbs out the bottom (unplugged, cool) and wipe the interior floor.
Keeping the crumb tray empty prevents most smoke, odor, and fire issues, so it’s the habit to prioritize above all others.
Cleaning the Racks and Interior
Beyond the crumb tray, the racks and interior walls need regular attention to remove grease and baked-on residue.
Racks and baking pan: 1. Remove the racks and any baking tray/pan. 2. Soak them in warm soapy water to loosen baked-on grease, then scrub with a sponge or brush. For stubborn residue, a baking-soda paste or a non-abrasive scrubber works. Many racks are dishwasher-safe (check your manual). 3. Rinse and dry fully before replacing.
Interior walls and floor: 1. With the oven unplugged and cool, wipe the interior walls, floor, and ceiling with a damp cloth and mild dish soap, or a baking-soda paste (baking soda + a little water) for baked-on grease and stains. Apply, let sit a few minutes, then scrub gently and wipe clean with a damp cloth. 2. Avoid the heating elements (the metal rods top and bottom) — never scrub them with water or abrasives. Wipe only gently around them with a barely-damp cloth if needed, and let them dry fully. They mostly self-clean by burning off residue during use. 3. Don’t use harsh chemical oven cleaners inside most toaster ovens (check your manual) — they can damage surfaces and leave fumes. Baking soda is the safe, effective choice. 4. Dry the interior fully before plugging in and using.
For non-stick interiors (some toaster ovens have them), use only soft cloths and non-abrasive cleaners to protect the coating.
Frequency: wipe the interior and clean racks every week or two, or whenever you see grease splatter or spills — cleaning spills soon after they happen (once cool) prevents baked-on buildup that’s much harder to remove later.
Cleaning the Glass Door and Exterior
The glass door and outside surfaces need cleaning too, both for appearance and function.
Glass door:
- The inside of the glass gets greasy and hazy over time. Clean it with a baking-soda paste (great for baked-on grease) or a mix of vinegar and water, applied with a cloth, left briefly, then wiped clean and dried. For heavy buildup, repeat.
- Avoid abrasive pads that scratch the glass. A non-scratch sponge or cloth is safe.
- Clean both the inside and outside of the glass for a clear view.
Exterior:
- Wipe the outside with a damp cloth and mild soap. Stainless steel exteriors clean well with a stainless cleaner or vinegar (wipe with the grain); dry to avoid streaks.
- Clean the control knobs and buttons with a damp cloth (not soaking), using a cotton swab for crevices.
- Don’t let water get into vents, controls, or the interior electronics.
Regular exterior wiping keeps grease from accumulating and the appliance looking good on the counter. Since toaster ovens sit out in view, a quick exterior wipe during each interior cleaning keeps it presentable.
A clean toaster oven — empty crumb tray, grease-free interior, clear glass — cooks better, smells better, and is far safer. Pair regular cleaning with our best toaster oven and best air fryer guides for models worth maintaining.
Frequently Asked Questions
How do I clean the inside of a toaster oven?
Unplug it and let it cool, then wipe the interior walls, floor, and ceiling with a damp cloth and mild dish soap, or use a baking-soda paste (baking soda plus a little water) for baked-on grease — apply, let sit a few minutes, scrub gently, and wipe clean. Avoid the heating elements (don’t scrub them with water or abrasives), and skip harsh oven cleaners. Dry the interior fully before use. Remove and wash the racks and crumb tray separately.
How often should I clean my toaster oven?
Empty and clean the crumb tray weekly (or more with heavy use) — this is the most important habit, since built-up crumbs cause smoke and fire risk. Clean the racks and wipe the interior every week or two, or whenever you see grease splatter or spills. Clean spills soon after they happen (once cool) to prevent hard baked-on buildup. Wipe the glass door and exterior during interior cleanings. Regular light cleaning is far easier than tackling heavy buildup.
Why is my toaster oven smoking?
Almost always built-up crumbs and grease, usually in the crumb tray or on the interior floor and elements, burning during use. Unplug it, let it cool, and empty/clean the crumb tray and wipe the interior thoroughly — this solves most smoking. Grease splattered onto the heating elements also smokes until it burns off. Keeping the crumb tray empty and the interior grease-free prevents smoke. Persistent smoke after cleaning could indicate food debris stuck near the elements.
Can I use oven cleaner in a toaster oven?
Generally no — most manufacturers advise against harsh chemical oven cleaners in toaster ovens, as they can damage interior surfaces and non-stick coatings and leave fumes near the heating elements. Check your manual. A baking-soda paste (baking soda and water) is the safe, effective alternative for baked-on grease and stains, along with mild dish soap and water. Reserve strong oven cleaners for full-size ovens rated for them, not compact toaster ovens.
How do I clean the glass door of a toaster oven?
Apply a baking-soda paste (baking soda plus a little water) or a vinegar-and-water mix to the greasy glass, let it sit briefly to loosen the residue, then wipe clean with a non-scratch cloth or sponge and dry. Repeat for heavy buildup. Clean both the inside (where grease accumulates) and outside of the glass for a clear view. Avoid abrasive pads that scratch. Doing this during regular cleanings prevents the hazy grease film from baking on hard.
Should I clean the heating elements of a toaster oven?
Only gently and carefully. Never scrub the heating elements (the metal rods) with water, abrasives, or cleaners — they can be damaged, and moisture is a hazard. They largely self-clean by burning off residue during use. If needed, wipe very gently around them with a barely-damp cloth once the oven is unplugged and fully cool, and let them dry completely before use. Focus your cleaning on the crumb tray, racks, interior walls, and glass, leaving the elements mostly alone.
Related buying guides: best blender, best instant pot and best stand mixer.
The Bottom Line
Cleaning a toaster oven is simple once you know the parts: unplug and cool it, then prioritize the crumb tray — slide it out, dump, and wash it weekly, since built-up crumbs cause smoke and fire risk. Wash the racks in warm soapy water, wipe the interior with a baking-soda paste (avoiding the heating elements and harsh oven cleaners), and clean the glass door with baking soda or vinegar. Wipe the exterior to keep it presentable. Clean spills soon after they cool to prevent baked-on buildup. A clean toaster oven cooks better, smells better, and is safer. See our best toaster oven and best air fryer guides.





Write Your Review
No reviews yet. Be the first to share your experience!