

In the baking sheet vs proofing basket question, the short answer is that they do different jobs: a proofing basket holds shaped dough while it rises, and a baking sheet carries dough into the oven. A banneton gives a wet, slack loaf the support it needs to rise up instead of spreading out, while a sheet pan is where most free-form breads, rolls and cookies actually bake. Most bread bakers end up owning both, and the real decision is which one your dough needs at each stage.
This guide walks through what each tool does, when you can proof directly on a baking sheet, when a basket makes a clear difference, and how to move dough from one to the other without losing the rise you waited hours for. It also covers the common mistakes that turn a promising loaf into a flat disc.
What each tool actually does
A baking sheet is a flat metal pan, usually aluminum or steel, with or without a rim. It conducts heat into the bottom of whatever sits on it and keeps dough from touching the oven rack. That’s its whole job. It doesn’t shape anything. Dough placed on a sheet spreads as far as its own gluten structure allows, which is fine for stiff doughs like bagels, pizza, focaccia, dinner rolls and enriched sandwich-style loaves.
A proofing basket, often called a banneton or brotform, is a round or oval form made from rattan, cane, bamboo, wood pulp or plastic. You dust it with flour, drop the shaped dough in seam side up, and let the final rise happen inside it. The walls hold the dough’s shape. The textured surface wicks a little moisture from the outer skin so it dries slightly, which makes scoring cleaner and helps the crust form. When the dough is ready, you flip it out onto parchment, a peel, a stone, a Dutch oven or yes, a baking sheet, and bake.
So the two aren’t really competitors. One is a rising tool and the other is a baking tool. The overlap only appears during the final proof, when you can choose to rise dough on the sheet or in the basket. If you’re starting sourdough from scratch and want the basket plus the other pieces in one box, a complete kit is the simplest route.

Toplepor
Temperature-Controlled Sourdough Proofing at Home: Toplepor Complete Sourdough Starter Kit with 70-100°F Warmer, Baskets and Lame
This kit pairs round and oval proofing baskets with a thermostat-controlled warmer that holds dough between 70°F and 100°F, so fermentation stays on schedule even in a cold kitchen. Buy it if you are starting sourdough from scratch or keep losing loaves to slow winter rises, since it replaces guesswork and a dozen separate tool purchases.
Pros and Cons
Pros
- Temperature control removes the biggest variable in sourdough, which is a kitchen that runs too cool for reliable fermentation.
- Both basket shapes are included, so you can bake boules and batards without buying a second banneton.
- Most tools wipe clean or go in the dishwasher, and the whole set stores back in its packaging.
- The included starter jar, stencil and bread bags cover the full cycle from feeding to gifting a finished loaf.
Cons
- The warmer needs counter space and a free outlet, which is a real constraint in small kitchens.
- Linen liners and rattan baskets must be brushed out and air dried by hand rather than washed with the rest of the kit.
Toplepor Temperature-Controlled Sourdough Proofing at Home: Toplepor Complete Sourdough Starter Kit with 70-100°F Warmer, Baskets and Lame
Toplepor
Temperature-Controlled Sourdough Proofing at Home: Toplepor Complete Sourdough Starter Kit with 70-100°F Warmer, Baskets and Lame
This kit pairs round and oval proofing baskets with a thermostat-controlled warmer that holds dough between 70°F and 100°F, so fermentation stays on schedule even in a cold kitchen. Buy it if you are starting sourdough from scratch or keep losing loaves to slow winter rises, since it replaces guesswork and a dozen separate tool purchases.
$89.99 at AmazonEditors' Favorite
Dimensions: 1 x 1 x 1 inches Product Group: Kitchen
Shop NowThe Toplepor Sourdough Starter Kit pairs a bread proofing basket with a thermostat-controlled sourdough warmer that runs from 70 to 100°F, so it covers both the rise and the starter care that comes before it. At a listed price of $89.99 it’s the most expensive option here, which makes sense mostly for bakers whose kitchen runs cold in winter and who want steadier fermentation.
When a baking sheet is enough for proofing
Plenty of breads proof perfectly well on a sheet pan. The rule of thumb is hydration and structure. Doughs at roughly 60 to 65 percent hydration (water weight compared with flour weight) are firm enough to hold a shape on their own. Think classic white sandwich dough shaped into a free-form oval, challah, brioche buns, soft pretzels and most yeasted rolls.
Lower-hydration and enriched doughs
Butter, eggs and milk make dough softer to the touch but also tighter once shaped, and these doughs rarely slump much. Shape them, set them on a parchment-lined sheet, cover loosely with a towel or an upturned bowl, and let them rise in place. You skip a transfer step entirely, which means no risk of deflating the dough when you move it. For rolls and buns, proofing on the sheet is simply the better method.
Flat and spread-out breads
Focaccia, flatbreads, pizza and sheet-pan pretzels are supposed to spread. A basket would work against you here. The dough should relax into the corners of a rimmed sheet, and you’ll often dimple or top it right on the pan. Same goes for ciabatta, which is usually proofed on a floured couche or sheet because it’s meant to stay flat and irregular.
A sturdy rimmed sheet also earns its place well beyond bread. If you’re building out a kitchen and comparing pan materials, our guide to the best cookware covers how aluminum, steel and clad metals handle heat, and the same logic applies to sheet pans.
When a proofing basket makes a real difference
High-hydration sourdough is where a banneton stops being optional. Once dough climbs past about 70 percent hydration, it behaves more like a thick batter held together by gluten. Shape it tightly and put it on a baking sheet, and within an hour it’ll spread into a wide, low puddle. A basket holds the walls up so the dough can only rise in one direction: up.
That vertical support pays off in the oven. A loaf proofed in a basket keeps more height going in, gets a better “oven spring” as trapped gas expands, and opens along its score line into a proper ear. The flour-dusted basket also leaves the familiar spiral or ring pattern on the crust, which is mostly cosmetic but signals a well-supported proof.
Bannetons are also the standard tool for a cold retard, when shaped dough rests overnight in the fridge at around 38 to 40°F. That long, slow rise develops sour flavor and makes the dough firmer and easier to score straight from the fridge. A basket fits on a fridge shelf, while a loaf on an open baking sheet takes up more room and dries out faster unless it’s well covered.
If you’re mostly after the basket plus the basics for measuring and storing starter, a smaller kit keeps the cost down.
YONILL
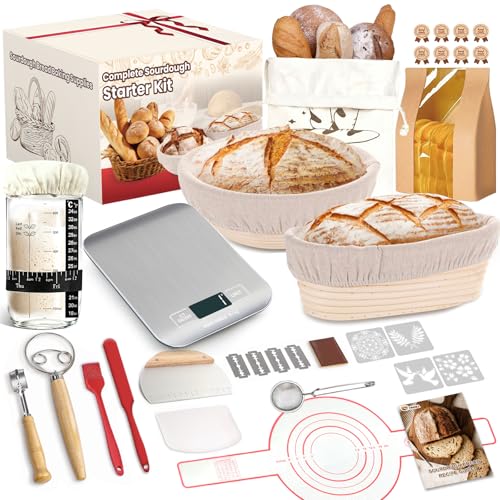
Sourdough Baking Kit with Digital Scale, Starter Jar and Two Rattan Bannetons - YONILL Complete Bread Proofing Basket Set
This 20-piece kit pairs two rattan bannetons with a digital kitchen scale and a 24oz starter jar, so one purchase covers weighing, fermenting, proofing, scoring and storing a loaf. Buy it if you are starting sourdough from scratch and want both oval and round loaf shapes handled without sourcing tools one at a time.
Pros and Cons
Pros
- Covers the entire sourdough workflow, from starter maintenance through scoring blades, scrapers, flour duster, stencils and storage bags.
- Includes a kitchen scale and a dedicated starter jar, which most banneton sets leave you to buy separately.
- Both baskets ship with linen liners, so you can proof sticky high-hydration dough or bake bare rattan for spiral rings.
- The printed manual walks through building a natural starter, useful if you have never fed one before.
Cons
- No Dutch oven or baking vessel is included, so you still need an oven-safe pot with a lid.
- Rattan baskets must be flour-dusted before every proof and brushed clean by hand rather than washed, and the linen liners need air drying.
YONILL Sourdough Baking Kit with Digital Scale, Starter Jar and Two Rattan Bannetons - YONILL Complete Bread Proofing Basket Set
YONILL
Sourdough Baking Kit with Digital Scale, Starter Jar and Two Rattan Bannetons - YONILL Complete Bread Proofing Basket Set
This 20-piece kit pairs two rattan bannetons with a digital kitchen scale and a 24oz starter jar, so one purchase covers weighing, fermenting, proofing, scoring and storing a loaf. Buy it if you are starting sourdough from scratch and want both oval and round loaf shapes handled without sourcing tools one at a time.
$39.99 at AmazonEditors' Favorite
Color: brown Size: 10" oval, 9" round Dimensions: 5 x 10 x 6 inches Weight: 4.2108292042 Pounds Product Group: Home
Shop NowThe YONILL Sourdough Starter Kit bundles a banneton bread proofing basket with a kitchen scale and a glass jar for the starter. That scale matters more than it sounds. Sourdough works by weight, and hydration percentages are meaningless if you measure flour by the cup. At a listed $39.99, it’s a lower-cost way to get every core piece at once, though it doesn’t include a warmer, so temperature control is up to your kitchen.
How to move dough from basket to baking sheet
The transfer is the step that worries new bakers most, and it’s simpler than it looks. Here’s the sequence most bread books and bakeries use.
First, prep the basket well. Dust it generously with rice flour, or a 50/50 mix of rice flour and all-purpose flour. Rice flour has no gluten and doesn’t absorb water the way wheat flour does, so the dough is far less likely to stick. Next, place the shaped dough in seam side up, so the smooth top of the loaf faces the bottom of the basket.
When the dough is ready, lay a sheet of parchment over the top of the basket, set your baking sheet or peel on top of the parchment, and flip the whole stack over in one quick motion. Lift the basket straight up. The loaf should drop out cleanly, smooth side up, onto the parchment. Score it, then slide it into the oven or into a preheated Dutch oven.
Baking a basket-proofed loaf on a plain sheet works, but you’ll lose some spring compared with a covered pot or a hot stone, because the sheet doesn’t trap steam. A simple fix: preheat the sheet in the oven, and put a pan of hot water on the rack below for the first 20 minutes. Many bakers use a heavy enameled pot for this instead; our roundup of best nontoxic cookware covers enameled cast iron options that double as bread ovens.
Common mistakes with each
Most failed loaves come down to a handful of avoidable errors. None of them are about the gear being wrong.
Under-flouring the basket is the classic one. A new banneton, especially rattan, needs a heavier dusting the first several uses until a thin layer of flour builds up in the grain. If dough sticks, it tears when you flip it and the loaf collapses on one side. Don’t wash a rattan basket with soap after each use either. Knock out the excess flour, let it air dry completely, and brush it out. Moisture left in the fibers can grow mold.
Over-proofing is the second big problem, and it’s easy to blame on the basket when it isn’t. Dough that’s risen too long loses its strength and spreads no matter what shape it was held in. A quick poke check helps: press a floured finger about half an inch into the dough. If the dent springs back slowly and leaves a slight mark, it’s ready. If it springs back instantly, give it more time. If it doesn’t spring back at all, bake it right away and expect a flatter loaf.
On the sheet side, the usual mistake is proofing slack dough on an unlined pan. It spreads, sticks to the metal and bakes into a flat oval with a pale bottom. Line the sheet with parchment, and if the dough is wetter than you’d like, lean on a basket next time. Another one: using a thin, warped sheet. Cheap pans buckle at high heat, and a buckled pan can tip a loaf or burn the bottom unevenly. A heavier pan, or two sheets stacked together, gives gentler bottom heat.
Finally, watch your kitchen temperature. Most sourdough recipes assume around 75 to 78°F. At 65°F, the same dough may take twice as long to rise. That’s where a controlled warmer or a proofing box earns its place.
Which one should you buy first?
If you bake mostly rolls, focaccia, pizza and enriched loaves, start with a good rimmed baking sheet. You’ll use it for bread, roasted vegetables and cookies every week. If you’re getting into sourdough or any high-hydration artisan loaf, add a basket. It’s a small, inexpensive tool that fixes the single most common sourdough complaint: loaves that spread instead of rise.
Basket shape matters too. Round bannetons make a boule. Oval ones make a batard, which is longer and easier to slice into even sandwich pieces and fits more easily on a standard sheet or in an oval pot. If you already own a starter jar and a scale and only need the basket itself, a single standalone banneton is the most economical choice.

Brod & Taylor
Sourdough Batard Proofing Basket for Artisan Bread, Brod & Taylor 10-Inch Banneton
This 10-inch Brod & Taylor batard banneton supports dough structure, releases dough smoothly, and helps create crisp, golden-crusted loaves. It suits home sourdough bakers who want stackable storage, lightweight construction, and more consistent loaf shaping.
Pros and Cons
Pros
- The ridged shape helps home bakers produce well-formed batard loaves.
- Its stackable design is useful for kitchens with limited storage space.
- The bamboo and sugarcane pulp construction balances low weight with dependable strength.
- The absorbent interior supports easier dough release and crust development.
Cons
- The linen liner is sold separately, adding an extra purchase for bakers who prefer lined proofing.
- This single 10-inch batard basket is designed for one loaf shape rather than multiple loaf sizes.
Brod & Taylor Sourdough Batard Proofing Basket for Artisan Bread, Brod & Taylor 10-Inch Banneton
Brod & Taylor
Sourdough Batard Proofing Basket for Artisan Bread, Brod & Taylor 10-Inch Banneton
This 10-inch Brod & Taylor batard banneton supports dough structure, releases dough smoothly, and helps create crisp, golden-crusted loaves. It suits home sourdough bakers who want stackable storage, lightweight construction, and more consistent loaf shaping.
$15.95 at AmazonEditors' Favorite
Color: Natural Size: 1 Pack Dimensions: 10 x 5.25 x 2.75 inches Product Group: Kitchen Binding: Home
Shop NowThe Brod & Taylor Banneton Batard is a 10-inch oval proofing basket made from bamboo and sugarcane pulp rather than rattan, and it’s designed to stack for storage. A 10-inch oval suits a loaf in roughly the 1.5 to 2 pound range, a common size for home recipes. At a listed $15.95, it’s the lowest-cost way to try basket proofing without buying a full kit, though you’ll need your own scale and starter container.
Once you’re baking regularly, the rest of your kit starts to matter as well. A sharp blade or knife helps you score and slice cleanly; see our guide to the best chef knife. And if you’re upgrading the pans you cook in alongside your bread gear, our guides to best nonstick cookware and best copper cookware compare how each material handles everyday use.
FAQ
Can I proof sourdough on a baking sheet instead of a basket?
Yes, but only if the dough is firm enough to hold its shape. Lower-hydration sourdough, around 65 percent, can rise on a parchment-lined sheet. Wetter doughs will spread, so a basket or a bowl lined with a floured towel gives better height.
What can I use if I don’t have a proofing basket?
A medium mixing bowl or colander lined with a well-floured linen or cotton towel works as a stand-in. It gives similar side support, though the towel won’t wick moisture quite as well and you won’t get the spiral pattern on the crust. Use rice flour on the towel to prevent sticking.
Do you bake bread in the proofing basket?
No. Rattan, cane, bamboo and pulp bannetons aren’t made for oven heat. You turn the dough out of the basket onto parchment, a peel, a baking sheet or into a preheated pot, then bake it there.
Is a baking sheet or a Dutch oven better for basket-proofed bread?
A preheated Dutch oven usually gives more oven spring and a crisper crust because it traps steam for the first part of the bake. A baking sheet works too, especially if you preheat it and add a pan of hot water to the oven for steam. Free-form oval loaves often fit a sheet more easily than a round pot.
How do I keep dough from sticking to a banneton?
Dust the basket with rice flour, or a mix of rice and wheat flour, before every use. New baskets need a heavier coat until flour settles into the surface. Let the basket dry completely between bakes and brush out the old flour rather than washing it with soap.


Write Your Review
No reviews yet. Be the first to share your experience!