

HomeWhisk earns commission from qualifying purchases made through links on this page. We research picks from specifications and owner reviews; we do not test products ourselves.
TL;DR — How to season a panini press is mostly about method: use the right touch, avoid shortcuts that damage the tool, and build the habit into normal kitchen cleanup. When this turns into a purchase decision, compare best french press, best air fryer, and best blender before narrowing your shortlist.
The HomeWhisk approach is research-first: compare construction, usability, cleaning, and long-term complaints before recommending a direction. For appliance topics, we pay close attention to capacity, controls, cleanup, storage, reliability complaints, and whether the machine saves enough effort to justify the space.

Deeper Dive: Our Top Picks
Our Top Picks

Generic
Press Single-Serve Paninis in Minutes: Mini Panini Press Grill in White for Small Kitchens
This mini panini press grills a sandwich from both sides at once between two hinged plates, so a hot pressed lunch is finished in one step without a skillet or spatula. It suits cooks feeding one or two people who want a white countertop unit small enough to store in a cabinet instead of surrendering counter space.
Pros and Cons
Pros
- Pressing and cooking happen simultaneously, cutting sandwich time compared with pan grilling.
- The mini size fits dorm rooms, office kitchens, and galley kitchens where a full grill will not sit.
- White casing matches standard small-appliance finishes on an open counter.
- No menus, timers, or removable parts to manage or lose.
Cons
- The listing publishes almost no specifications, so wattage, plate coating, and exact dimensions are unconfirmed before you buy.
- One sandwich per cycle means cooking for a family takes several rounds.
VEVOR
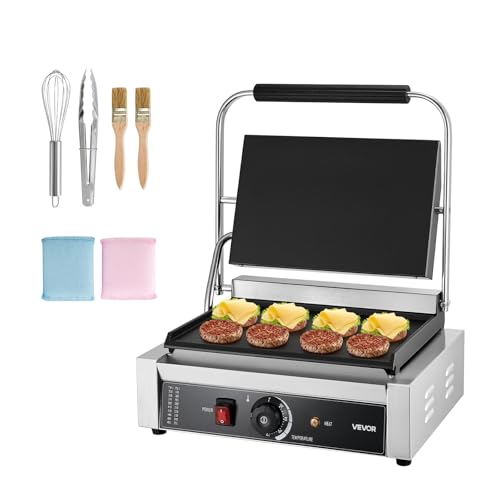
Commercial Panini Press for Cafes and Home Kitchens: VEVOR 1800W Electric Sandwich Grill with Temp Control
This 1800W press grills paninis, burgers, steaks, and full breakfasts on a 13.5x9.3 inch flat enamel plate with top and bottom heating tubes firing at once for faster cook times. It suits cafe owners, food truck operators, and home cooks who need commercial output and dialed-in heat from 122°F to 572°F.
Pros and Cons
Pros
- Flat enamel plate handles eggs, bacon, and pancakes as easily as pressed sandwiches, unlike ridge-only presses.
- LED indicator shows heating status so you know when the plate has reached your set temperature.
- Side vents on both sides dissipate heat, which matters during long continuous cooking sessions.
- Stainless steel exterior wipes down quickly between orders.
Cons
- The flat plate will not produce the classic grill sear marks that ridged panini plates leave on bread.
- At 1800W this draws heavy current, so check your circuit capacity before adding it to a loaded kitchen line.
Victoria
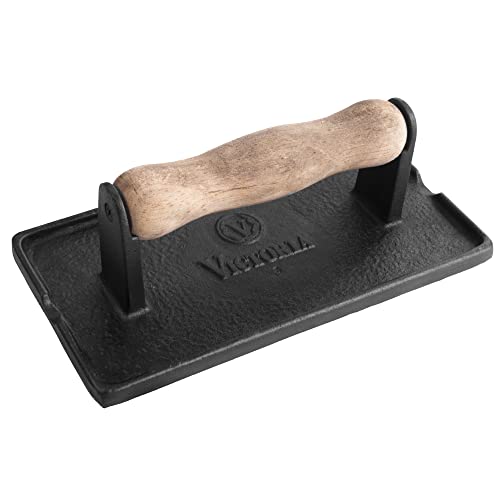
Cast Iron Bacon and Panini Press for Flat
This 2.4-pound cast iron press holds bacon, burgers, and sandwiches flat against the pan so they cook faster and brown evenly instead of curling. It suits home cooks who make bacon or griddled sandwiches often and want a preseasoned, PTFE- and PFOA-free tool that outlasts nonstick alternatives.
Pros and Cons
Pros
- Rectangular footprint covers several bacon strips or a full sandwich in a single press.
- Cast iron holds heat well, so the top surface of food browns instead of steaming.
- Removable wood handle stays cooler to grip and makes reseasoning the iron straightforward.
- Built by a manufacturer producing cast iron in its own Colombian factories since 1939.
Cons
- Cast iron requires hand washing and drying immediately, plus occasional reseasoning to prevent rust.
- The wood handle limits how much direct oven or high grill heat the press can safely take.
Editors' Picks
Generic Press Single-Serve Paninis in Minutes: Mini Panini Press Grill in White for Small Kitchens
Generic
Press Single-Serve Paninis in Minutes: Mini Panini Press Grill in White for Small Kitchens
This mini panini press grills a sandwich from both sides at once between two hinged plates, so a hot pressed lunch is finished in one step without a skillet or spatula. It suits cooks feeding one or two people who want a white countertop unit small enough to store in a cabinet instead of surrendering counter space.
Check PriceEditors' Favorite
Color: White Size: standard Dimensions: 9 x 9 x 4 Inches Product Group: Kitchen
Shop NowVEVOR Commercial Panini Press for Cafes and Home Kitchens: VEVOR 1800W Electric Sandwich Grill with Temp Control
VEVOR
Commercial Panini Press for Cafes and Home Kitchens: VEVOR 1800W Electric Sandwich Grill with Temp Control
This 1800W press grills paninis, burgers, steaks, and full breakfasts on a 13.5x9.3 inch flat enamel plate with top and bottom heating tubes firing at once for faster cook times. It suits cafe owners, food truck operators, and home cooks who need commercial output and dialed-in heat from 122°F to 572°F.
$149.90 at AmazonGreat Value
Color: Stainless Steel Size: 16.7x15.8x8.1 inch Dimensions: 16.7 x 15.8 x 8.1 inches Weight: 37.92 pounds Product Group: BISS Binding: Kitchen
Shop NowVictoria Cast Iron Bacon and Panini Press for Flat
Victoria
Cast Iron Bacon and Panini Press for Flat
This 2.4-pound cast iron press holds bacon, burgers, and sandwiches flat against the pan so they cook faster and brown evenly instead of curling. It suits home cooks who make bacon or griddled sandwiches often and want a preseasoned, PTFE- and PFOA-free tool that outlasts nonstick alternatives.
$19.99 at AmazonColor: Black Size: Regular Press Dimensions: 8.5 x 4.25 x 2.75 inches Weight: 2.53972525824 Pounds Product Group: Kitchen Binding: Kitchen
Shop NowSeasoning a Panini Press: The Essentials
Seasoning builds a slick, protective layer on a bare panini press and is the difference between a surface that releases food and one that fights you. It is a thin-layers-over-time job, not a one-time coat, so patience beats effort here.
Step By Step
1. Scrub the panini press clean and dry it fully over low heat. 2. Wipe on the thinnest possible film of a high-smoke-point oil. 3. Buff until it looks almost dry — excess oil turns sticky, not slick. 4. Heat past the oil’s smoke point, let it cool, and repeat for several layers.
What You Will Need
Keep it simple: the appliance itself, a clean workspace, and any basic supplies the material calls for. Set up before you start so you are not improvising mid-task.
Keeping It That Way
Maintenance beats repair. Fold checking the seals and gaskets, not overfilling past the max line, and descaling water-based units into your routine and the appliance will stay reliable for years. Neglect any one of them and you invite unresponsive controls back.
Before You Start
Match the method to the appliance in front of you. Season a panini press is not hard, but the details matter — the wrong approach to letting the motor rest between heavy loads can shorten the life of otherwise good small kitchen appliances. For product picks, compare best french press, best air fryer, and best blender.
How To Know You Did It Right
The result should be practical and repeatable: the appliance should work cleanly, feel controlled, and show no signs of uneven cooking or heating. If the same issue returns quickly, the cause is usually a missed care step — not the tool itself.
Related Product Guides
If this topic is part of a buying decision, these are the HomeWhisk guides most closely tied to it:
Frequently Asked Questions
What is the right way to season a panini press?
Seasoning builds a slick, protective layer on a bare panini press and is the difference between a surface that releases food and one that fights you. Do it consistently and you avoid unresponsive controls.
What is the bottom line?
Match the appliance to your real habits: buy for durability if it is daily, for value and storage if it is occasional.
What should I avoid?
Avoid buying by brand alone, ignoring wiping the interior after use, and oversizing for your space. Each invites motors that bog down under load down the line.
How do I keep it in good shape?
Build letting the motor rest between heavy loads, and cleaning removable parts by hand into normal cleanup. Light, consistent care prevents motors that bog down under load far better than occasional deep effort.
Is a premium appliance worth it?
Only if you use it enough to notice better control, durability, or cleanup regularly. Occasional users are well served by a mid-range pick like those in best blender.
The Bottom Line
For most home cooks, the best choice is the one that removes friction without adding maintenance you will ignore. Start with your use case, then cross-check best french press, best air fryer, and best blender.


Write Your Review
No reviews yet. Be the first to share your experience!