

TL;DR — A good answer to indoor outdoor electric grill starts with real kitchen habits, not a perfect spec sheet. Most readers need a clear way to avoid the wrong tool, not another list of features. Use this as the practical background, then check best air fryer, best blender, and best instant pot for specific product options.
We treated this as an editor’s note for home cooks: what matters, what is optional, and which related product guides are worth checking before you buy. For appliance topics, we pay close attention to capacity, controls, cleanup, storage, reliability complaints, and whether the machine saves enough effort to justify the space.

Pros & Cons
Pros
- Temperature probe dials in anything from 450°F searing heat down to low griddle temperatures for eggs and flapjacks.
- Dome lid traps heat for faster cooking and has divots that let you prop it open when you want airflow instead.
- Stay-cool top handle lets you lift the lid and check food without reaching for a towel.
- Runs on electricity indoors or out, so grilling continues through winter and in buildings that ban charcoal and propane.
Cons
- Utensils for the front rack are sold separately, so the storage feature costs extra to actually use.
- A 450°F ceiling is below what charcoal and gas grills reach, so hard steakhouse-style crusts take longer to develop.
Details
An electric grill and griddle in one body, built for cooks who want grilled food without a gas line, charcoal, or outdoor-only equipment.
Swappable ceramic nonstick plates handle burgers and steaks on the grill side, then pancakes, eggs, and salmon on the flat griddle. The adjustable probe reaches 450°F.
PFAS-free ceramic nonstick surface, a dome lid with prop-open divots, a stay-cool handle, and a removable stand with a shelf and utensil rack.
Peak heat tops out at 450°F, lower than gas or charcoal, so deep sear crusts need more patience.
Best for apartment cooks, RV travelers, and families who grill year-round regardless of weather or building rules.
How to Use
Choose your plate first. Grill plate for burgers, steaks, and veggies; griddle plate for pancakes, eggs, and salmon. Seat the plate, attach the temperature probe, then preheat.
Set heat by task: 450°F to sear steaks, mid-range for chicken and vegetables, low for eggs and flapjacks. Close the dome to speed cooking, or use the divots to prop it open for airflow.
Let plates cool, then wipe the ceramic nonstick with a soft cloth and clear the center grease channel. Skip metal tools and abrasive pads to protect the coating.

Save $5.23
Pros & Cons
Pros
- Cast iron grates hold heat better than the thin steel grates typical at this size, which helps with sear marks on steaks and burgers.
- The venting system releases steam so meat browns instead of stewing in its own moisture.
- Stand detaches for tabletop use, making one grill work on a balcony, a picnic table, or beside an RV.
- Backed by a 30-day return window and a 12-month coverage promise.
Cons
- At 1600W it draws heavily from a standard household circuit, so running it alongside other high-wattage appliances on the same breaker can trip it.
- Electric heat will not reproduce the smoke flavor of charcoal or wood, which matters if that is what you are after.
Details
A 1600W electric grill that solves the apartment problem: grilled food where charcoal and propane are prohibited by lease or fire code.
The 240-square-inch grate cooks around 15 servings at once, and five probe-controlled heat settings cover searing through gentle finishing.
Porcelain-coated cast iron grates resist rust and clean easily. The removable stand converts it from freestanding to tabletop, and the unit fits a compact car trunk.
The honest limitation: 1600W on a shared circuit can trip a breaker, and electric heat produces no smoke flavor.
Best for apartment and condo dwellers, RV owners, and tailgaters who need real grilling without an open flame.
How to Use
Plug into a dedicated outlet, not a shared extension cord. Close the hood and preheat on high for several minutes so the cast iron grates store enough heat to sear.
Start proteins on a high setting for crust, then step down to a lower setting to finish through. Keep the hood closed between flips so the interlocking hood and bowl hold temperature.
Unplug and let the grates cool before cleaning. The porcelain coating wipes clean with a damp cloth, so skip steel wool that would scratch it.

Pros & Cons
Pros
- The 1800W element provides rapid, even heating for everyday grilling.
- A built-in smoker box offers more authentic barbecue flavor than basic electric grills.
- The removable reinforced-polymer stand supports both pedestal and tabletop setups.
- The lid thermometer, adjustable control, nonstick plate, and drip tray improve cooking control and cleanup.
Cons
- The lightweight stand uses reinforced polymer rather than metal, which may disappoint buyers expecting a heavier frame.
- The grill is designed to minimize smoke, but wood chips and fatty foods can still produce smoke in enclosed spaces.
Details
This 2-in-1 electric grill gives apartment and small-space cooks a charcoal-free way to grill on a balcony, patio, or countertop.
Its 1800W element provides rapid, even heat, while the smoker box accepts wood chips to add smoky flavor to meat and vegetables.
The removable stand is lightweight, heat-resistant reinforced polymer rather than metal. The manufacturer does not provide dimensions or total weight in the supplied specifications.
Although optimized for smokeless performance, the grill may still release smoke when using wood chips or cooking fatty ingredients.
Best for apartment residents who want flexible tabletop or pedestal grilling with smoke flavor and simple cleanup.
How to Use
Attach the pedestal for balcony or patio cooking, or remove it for tabletop use on a stable, heat-resistant surface with suitable ventilation.
Add wood chips to the smoker box when smoke flavor is wanted, then set the temperature dial and monitor heat through the lid thermometer.
After the grill cools, wipe the nonstick plate and empty the removable drip tray to prevent grease buildup.

Pros & Cons
Pros
- Two appliances in one, since the griddle body detaches from the stand for indoor tabletop use.
- Electric heat with a temperature probe gives repeatable settings that charcoal and propane griddles cannot match.
- Built-in grease channel and cup keep the cooking surface clear during long batch cooking sessions.
- No hardware or tools required for setup, so it can be assembled and stored seasonally without hassle.
Cons
- It requires a nearby outlet, so the 6-foot cord limits placement in larger yards without an outdoor-rated extension.
- The 350°F minimum setting runs hot for delicate tasks like warming tortillas or gentle egg scrambles.
Details
A 2-in-1 electric griddle for cooks who want flat top cooking outdoors but lack space or permission for a full gas grill.
The 240 square inch nonstick surface holds a family breakfast at once, while five settings from 350°F to 550°F handle eggs through seared burgers.
The griddle plate detaches from the stand for tabletop use, and the center channel routes grease to a cup underneath for clean batch cooking.
Electric operation means outlet access dictates placement, and the 6-foot cord is short for open yards.
Best for apartment, balcony, and patio cooks who want griddle capacity without a permanent outdoor grill.
How to Use
Assemble the stand without tools, seat the griddle, then insert the temperature probe fully before plugging in. Preheat five to ten minutes at your target setting.
Use 350°F for eggs and pancakes, mid settings for bacon and sandwiches, and 550°F for smash burgers and stir-fries. Position the grease cup before cooking fatty proteins.
Scrape drippings toward the center channel while the surface is warm, then unplug, cool, and wipe the nonstick top. Never submerge the probe or power unit.
Pros & Cons
Pros
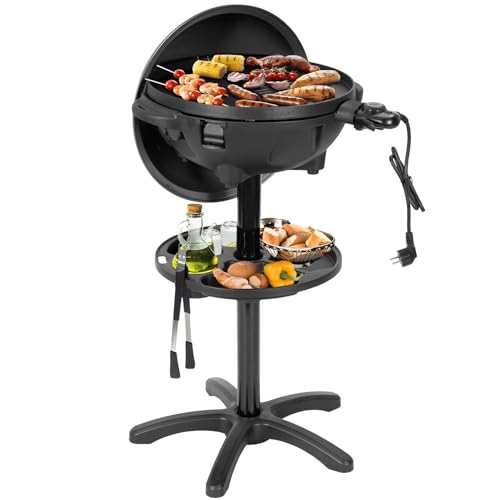
- Built-in lid thermometer lets you monitor temperature for roasts and thicker cuts without lifting the cover.
- Lid hook holds the cover open securely while you flip food with both hands free.
- Removable nonstick plate goes straight into the dishwasher rather than requiring a wire brush.
- Two-in-one stand and tabletop design adapts to small patios and indoor counters alike.
Cons
- Electric heat will not reproduce the smoke flavor a charcoal or wood pellet grill delivers.
- It needs to stay within reach of a power outlet, which limits use at campsites or beaches without electricity.
Details
An electric grill for cooks who want grill marks but cannot use charcoal or gas, common in apartments, condos, and buildings with open-flame restrictions.
Three heat settings and a lid thermometer give control across searing steaks and slow-roasting vegetables, with 200 square inches for a full family batch.
The nonstick plate is dishwasher safe, the drip tray pulls out for grease, and the frame converts between a floor stand and tabletop footprint.
No smoke flavor and no cordless operation, so it needs an outlet nearby.
Best for apartment and small-patio cooks who grill year-round and want cleanup to take minutes.
How to Use
Set the grill on a stable surface, attach the stand for outdoor use or leave it tabletop indoors, then preheat on the highest setting with the lid closed until the thermometer settles.
Sear steaks and burgers on high, then drop to a lower setting to finish thicker cuts. Keep the lid closed for chicken and roasts to hold heat.
Unplug and cool before cleaning. Slide out the drip tray, empty the grease, and put the nonstick plate in the dishwasher or wipe it with a soft sponge.

Pros & Cons
Pros
- No flare-ups or open flame makes it usable on balconies and in buildings where charcoal and gas grills are banned.
- Cast iron grates hold heat well enough to produce genuine sear marks rather than steamed food.
- Compact footprint fits the trunk of a small car for camping, RV trips, and tailgating.
- Backed by a 30-day return window and a 12-month coverage promise.
Cons
- It needs a nearby power outlet, which rules out remote campsites and any location without electricity.
- At 1600W, recovery after opening the lid is slower than a gas grill, so heavy loads of cold meat take longer to come back up to temperature.
Details
A 1600W electric grill that solves the apartment problem: real grilling where charcoal and propane are prohibited by a lease or fire code.
The 240-square-inch rack handles burgers for a group in one pass, and five heat settings cover low-temperature vegetables through high-heat steak searing.
Porcelain-coated cast iron grates sit in an interlocking hood and bowl assembly with a vent. The removable stand lets it work as a floor unit or a tabletop grill.
Electricity is mandatory, so off-grid campsites and beaches without outlets are out of range.
Best for renters, condo owners, and RV travelers who want grilled food without an open flame.
How to Use
Assemble the stand or set the bowl on a heat-safe table, seat the grates, and attach the temperature probe before plugging in. Use a dedicated outlet rather than a shared power strip.
Preheat with the hood closed on the highest setting for roughly ten minutes, then drop to your target heat. Sear on high first, then reduce for thicker cuts.
Unplug and cool fully before cleaning. The porcelain coating releases residue with warm soapy water and a soft brush; skip steel wool, which scratches the finish.
Pros & Cons
Pros
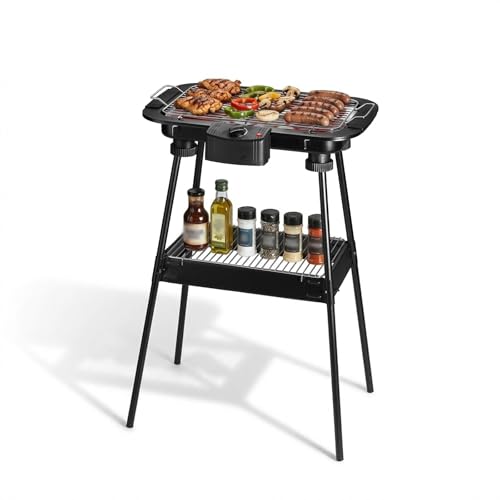
- Runs off standard power plus vehicle outlets and power banks, making it viable for camping and tailgating.
- Two-in-one stand design covers both backyard grilling and indoor tabletop dining without buying a second unit.
- Water-filled grease tray handles the messiest part of grilling and empties in one pour.
- Non-stick surface and removable parts keep cleanup to a rinse rather than a scrub.
Cons
- The heating element and power cord cannot be submerged or put in the dishwasher, so that piece needs hand wiping every time.
- Electric heat does not reach charcoal searing temperatures, so thick steaks will brown more slowly than on gas or coals.
Details
An electric grill for people who want barbecue food without a charcoal or propane setup, solving the problem of grilling in apartments, on covered balconies, or in bad weather.
The SUS tubular element heats the 15 by 8.8 inch non-stick plate while drippings fall past it into the tray below, which is why there is no flare-up smoke to set off an alarm.
The grill nest is rust-proof and dishwasher safe, the plate feeds 4 to 7 servings per round, and the stand detaches so the unit doubles as a tabletop cooker.
The heating element with its attached cord is the one part that cannot be washed, so it needs wiping down by hand after each session.
Best for apartment dwellers, campers, and anyone who wants a grill they can run year-round from a wall outlet or power bank.
How to Use
Assemble the stand with no tools, fill the grease tray with water before you plug in, and set the grill nest in place. The water catches drippings and stops smoke.
Preheat the element, then load the plate. Cook in a single layer across the 15 by 8.8 inch surface rather than crowding it, so pieces sear instead of steam.
Unplug and cool, pour the tray water off, and wash the nest and removable parts. Wipe the heating element with a damp cloth only, never rinse it.

Pros & Cons
Pros
- Extra-large 240+ square inch cooking area handles family-sized meals or party portions in one session.
- Built-in grease management system with sloped surface and removable drip tray simplifies cleanup and reduces flare-ups.
- Dual-mode design works as freestanding outdoor grill with stand or space-saving tabletop unit without stand.
Cons
- Zero verified customer reviews makes real-world performance and durability difficult to assess before purchase.
- Non-stick coating longevity and heat retention compared to cast iron or stainless steel grills remains unproven in field use.
Details
The I-Keukenn electric grill solves the balcony and apartment cooking restriction problem by eliminating smoke, propane tanks, and open flames while delivering 240+ square inches of grilling capacity.
The 1500W heating system with adjustable thermostat provides precise temperature control for searing steaks at high heat or cooking pancakes at lower temperatures. The sloped non-stick surface directs grease into a large removable drip tray, cutting smoke production and post-cook scrubbing time.
The unit measures 35 inches with stand attached and features a removable steel stand that converts it from freestanding to tabletop configuration. The non-stick baking pan surface eliminates the need for excessive oil while the aluminum construction keeps the total weight manageable for transport.
With zero customer reviews at launch, long-term durability of the non-stick coating under repeated high-heat use remains unverified. Buyers should test return policies if coating performance matters for their cooking style.
Best for renters, balcony cooks, and campers who need regulatory-compliant outdoor cooking without sacrificing capacity or temperature control.
How to Use
Attach the stand by sliding support legs into frame slots until they click, then place the grill pan on top. Plug into a standard 120V outlet and turn the thermostat dial to your target temperature. Allow 3-5 minutes for the surface to reach cooking temperature before adding food.
For searing meats, set the dial to maximum and preheat fully. For vegetables or eggs, use medium settings to prevent sticking. The sloped surface automatically channels grease toward the front drip tray during cooking.
After cooking, unplug and let the surface cool for 10 minutes. Remove the drip tray and dispose of collected grease. Wipe the non-stick surface with a damp cloth or sponge while still warm. Avoid abrasive scrubbers that damage the coating.
Common Misconceptions
The biggest myth is that the most expensive appliance is automatically the best for you. In reality, the right choice depends on motor or heating-element power, and speed under load — plus your own habits. Another trap is buying by brand alone — the same maker sells both excellent and forgettable lines.
Why It Matters
The variables that decide the outcome — build quality of seals, storage bulk, and speed under load — are the ones buyers most often overlook. That is why two appliances that look alike can feel completely different in use — one saves time, the other quietly adds friction to every task. If you are shopping, our best air fryer and best blender guides are the fastest way in.
Who Benefits Most
This matters most for small-kitchen owners, and families cooking in volume. If that is you, treat digital versus dial controls, and build quality of seals as non-negotiable. Casual users can relax the requirements and prioritize price and storage instead.
When It Is Worth Paying More
Spending up pays off when you use the appliance often enough to notice better day-to-day handling every week. If it only comes out occasionally, a mid-range pick is the smarter call. Match the money to frequency of use, not marketing.
What To Look For
Judge a appliance by how it feels in normal use, how easy it is to clean, and whether it solves the job you bought it for. Those are the variables that decide whether it earns a spot in your kitchen or ends up unused. Ignore cosmetic upgrades until the fundamentals check out.
How To Get It Right
Think through the whole workflow: cleaning removable parts by hand, not overfilling past the max line, and letting the motor rest between heavy loads. A appliance that fits your routine and cleanup habits beats a technically superior one you fight with. We cover specific models in best air fryer, best blender, and best instant pot.
Related Product Guides
If this topic is part of a buying decision, these are the HomeWhisk guides most closely tied to it:
Frequently Asked Questions
What should I avoid?
Avoid buying by brand alone, ignoring not overfilling past the max line, and oversizing for your space. Each invites motors that bog down under load down the line.
Who is this most useful for?
Mainly gadget-minimalists who want one do-it-all unit, and families cooking in volume. If that is you, treat speed under load as a requirement rather than a nice-to-have.
Is a premium appliance worth it?
Only if you use it enough to notice better control, durability, or cleanup regularly. Occasional users are well served by a mid-range pick like those in best instant pot.
What gear pairs well with it?
Start with a reliable core piece, then add as needs appear. Compare best air fryer, best blender, and best instant pot for related choices.
What is the bottom line?
Match the appliance to your real habits: buy for durability if it is daily, for value and storage if it is occasional.
The Bottom Line
A good indoor outdoor electric grill decision should feel obvious after you line up size, material, cleaning, and durability. If it is still a purchase question, the next step is best air fryer, best blender, and best instant pot.









Write Your Review
No reviews yet. Be the first to share your experience!